Dear Jess,
People tell me the weather is getting cooler... my body isn't listening. I'm still wearing tank tops, as my belly acts like my own internal furnace. That being said... I am loving this time of year. The colours, the breeze, the frost and the food! (I am making a pot of Chicken Corn Chowder for dinner tonight!)
Whimsical is how I would describe this season. It is also how I would describe these muffins. I found them while looking for a 'different' muffin recipe. I make a lot of muffins, as Jason takes them in his lunch, and they're an easy little snack for me to throw in my purse as a 'just in case'. I was getting bored of my usual banana, or oatmeal chocolate chip, and wanted something a little more special. Apparently raspberries are the answer.
Raspberry Chocolate Chip Muffins
adapted from www.sallysbakingaddiction.com
3 cups whole wheat flour
4 tsp baking powder
1 tsp salt
1 tsp cinnamon
2 large eggs
3/4 cup white sugar
1/4 cup brown sugar
1 cup milk
1/2 cup olive oil
1 tsp vanilla
2/3 cup chocolate chips
1 1/4 cup frozen raspberries
Preheat oven to 425F.
In a large bowl mix flour, baking powder, salt and cinnamon.
In a medium bowl mix eggs and sugars. Add milk, oil and vanilla. Add to flour mixture.
Add chocolate chips and raspberries. Evenly distribute in lined muffin tins.
Bake for 5 minutes. Without taking muffins out, change temperature to 375F and continue baking for 15 minutes, or until toothpick inserted comes out clean.
This is great, as I usually get frozen fruit on sale. You could also use fresh, but I find that it adds too much moisture. People say the frozen ones will dye your batter... I don't mind it when this happens... and I haven't found that it makes a big difference in this recipe.
I hope all is well as you gear up for Christmas! Our church started Operation Christmas Child already, which always makes the holiday season a little more real to me.
Love,
Showing posts with label chocolate. Show all posts
Tuesday, October 29, 2013
Monday, April 15, 2013
Toffee Squares
Dear Sally,
I'm not sure if I told you this but I am on the 'Treat Team' at church and we each bring treats once every six weeks. I was supposed to bring these squares last week. I had prepared them a week in advance and put them in my freezer so I could take them out the day before. It turns out that I forgot to bring them to church so Jesse enjoyed snacking on them instead. From what I hear they are quite delicious!
Directions
Jesse and I are looking forward to the get together in a couple of weeks. It will be nice to catch up with everyone and to see you guys. I was hoping we could come early to visit before everyone else comes and festivities start so look out! I'll let you know first ;)
Love,
I'm not sure if I told you this but I am on the 'Treat Team' at church and we each bring treats once every six weeks. I was supposed to bring these squares last week. I had prepared them a week in advance and put them in my freezer so I could take them out the day before. It turns out that I forgot to bring them to church so Jesse enjoyed snacking on them instead. From what I hear they are quite delicious!
Toffee Squares
(Adapted from Bake or Break)
Ingredients
2 cups
all-purpose flour
1/4 teaspoon
baking soda
1/4 teaspoon
salt
2/3 cup
unsalted butter, softened
2 cups
packed light brown sugar
2 large
eggs, at room temperature
2 teaspoons
vanilla extract
1 & 1/2
cups milk chocolate chips
1/2 cup
butterscotch chips
3/4 cup Skor
bits
1/2 cup
coconut flakes
Preheat oven
to 350°. Grease 2 9-inch square
baking pans. Line with parchment paper or grease.
Whisk
together flour, baking soda, and salt. Set aside.
Beat butter
until light and fluffy. Add brown sugar and continue beating until creamy. Add
eggs, one at a time, mixing well after each addition. Mix in vanilla.
Gradually
add flour mixture, mixing until almost blended. Divide into two equal sections.
Transfer dough to prepared pans and spread evenly.
Sprinkle top
with chocolate chips, butterscotch chips, Skor bits, and coconut.
Bake for
30-35 minutes, or until edges are golden and topping is bubbly and lightly
browned. Cool completely in pan before cutting into squares.
Jesse and I are looking forward to the get together in a couple of weeks. It will be nice to catch up with everyone and to see you guys. I was hoping we could come early to visit before everyone else comes and festivities start so look out! I'll let you know first ;)
Love,
Tuesday, February 19, 2013
Gluten-Free Banana Carob Chip Muffins
Dear Sally,
Gluten-Free Carob Chip Banana Muffins
Modified from The Best of This Life
2 cups
of almond flour
1 cup of
gluten-free oats
1 tsp of
baking powder
1 tsp of
cinnamon
1 tsp of
natural vanilla
1/3 cup honey
1 cup of
mashed bananas (approximately 3
very ripe bananas)
1/2 cup
of unsweetened almond milk
1/2 cup
of melted coconut oil
2 eggs
2/3 cup
of semi-sweet carob chips
1. Preheat oven to 350 F.
2. Grease or line muffin
pan for 12 muffins.
3. In a large mixing
bowl, combine all dry ingredients. Mix thoroughly.
4. In a smaller mixing
bowl, whisk eggs, add oil and maple syrup.
5. Combine wet
ingredients into dry ingredients, adding the mashed bananas.
6. Mix well and then add
the chocolate chips.
7. Pour the mixture into
the muffin pan in equal parts.
8. Bake for 22-25 minutes
- tops will crack open when ready, always
test the center to make sure it comes out clean on a knife.
I hope you and Jason had a great Family Day. Jesse and I took the quad out on lake Simcoe and after a cold day on the ice it was nice to come home to a hot cup of tea and delicious muffin.
Love,
Thursday, January 3, 2013
Holiday Bark
Dear Sally,
Merry Christmas! I suppose it is more appropriate to say Happy New Year! It has been an amazing holiday and I feel more rested and like myself than I have in a very long time. I had originally planned this amazing week of baking and cooking before Jesse and I went up to a cottage. This never happened. My sniffles started on the last day of school and the developing cold knocked me out for a good week and a half. The silver lining was my discovery of ALL of the Anne books. I dove into the world of Green Gables while resting in bed and I have not been able to put it down. I am only on the second book but I have already fallen in love with the stories. I feel a trip out east coming on.
Once returned to a normal state of mind I madly tried to get things together for Christmas gifts. I fell back on some of my mom's classic Christmas treat recipes. I attempted some traditional shortbread bookies. I rolled and cut them and then crawled back to bed. My saint of a husband cooked them for me and bless his heart they all went flat on him! The poor man didn't want to cook the rest he felt so bad. It was amusing to hear his recollections in the morning. One thing that DID turn out a success was the candy cane almond bark. I used my mom's traditional recipes and added a twist of my own. This recipe is so simple anyone can do it and Jesse took extreme pleasure in crushing the candy canes himself with our meat tenderizer.
I cannot tell you how much I would have loved to share a kitchen, a bottle of wine and some amazing Christmas recipes with you this year. I think we will have to make that a staple for the years to come. My place or yours I don't care.
My mind still has a hard time adjusting to the new year. I wish you and Jason many blessings and much love for the new year. I miss you!

Candy Cane Almond Bark
Ingredients
Approx. 2 cups white Merkins chips
Approx. 2 cups milk chocolate Merkins chips
2 cups almonds
1 1/2 cups candy cane or mint candy
Almond or mint extract
Directions
1. Turn on oven to 350-375. Roast the almonds on a baking sheet for 8-10 minutes or until lightly browned and crackly. Remove from the oven and set aside.
2. Open all the candies or candy canes and place them in a thick Ziploc freezer bag. Using a rolling pin or meat mallet crush the candies into small pieces. Do not make it a powder.
3. Choose one type of bark to make at a time. I did my white chocolate chips first. Place chips in a large microwave safe bowl and cook on high for 2-3 minutes. Check the chips and stir to make sure everything is melted.
4. When the chocolate is melted add the crushed candy cane and the almonds. Stir until everything is mixed well and then add mint or almond extract. The traditional recipe calls for only almonds and almond extract. Feel free to combine the flavours as you would like.
5. Pour the mixture out onto a sheet of waxed paper that is laying on a cooking sheet. Place the warm chocolate in the fridge to cool.
6. Repeat steps 1-5 using milk chocolate instead of white. When the bark has cooled remove it from the fridge and gently drop it onto the table. This will break the bark into bite sized pieces. If all else fails I sometimes break the bark apart with my clean hands.
Merry Christmas! I suppose it is more appropriate to say Happy New Year! It has been an amazing holiday and I feel more rested and like myself than I have in a very long time. I had originally planned this amazing week of baking and cooking before Jesse and I went up to a cottage. This never happened. My sniffles started on the last day of school and the developing cold knocked me out for a good week and a half. The silver lining was my discovery of ALL of the Anne books. I dove into the world of Green Gables while resting in bed and I have not been able to put it down. I am only on the second book but I have already fallen in love with the stories. I feel a trip out east coming on.
Once returned to a normal state of mind I madly tried to get things together for Christmas gifts. I fell back on some of my mom's classic Christmas treat recipes. I attempted some traditional shortbread bookies. I rolled and cut them and then crawled back to bed. My saint of a husband cooked them for me and bless his heart they all went flat on him! The poor man didn't want to cook the rest he felt so bad. It was amusing to hear his recollections in the morning. One thing that DID turn out a success was the candy cane almond bark. I used my mom's traditional recipes and added a twist of my own. This recipe is so simple anyone can do it and Jesse took extreme pleasure in crushing the candy canes himself with our meat tenderizer.
I cannot tell you how much I would have loved to share a kitchen, a bottle of wine and some amazing Christmas recipes with you this year. I think we will have to make that a staple for the years to come. My place or yours I don't care.
My mind still has a hard time adjusting to the new year. I wish you and Jason many blessings and much love for the new year. I miss you!

Candy Cane Almond Bark
Ingredients
Approx. 2 cups white Merkins chips
Approx. 2 cups milk chocolate Merkins chips
2 cups almonds
1 1/2 cups candy cane or mint candy
Almond or mint extract
Directions
1. Turn on oven to 350-375. Roast the almonds on a baking sheet for 8-10 minutes or until lightly browned and crackly. Remove from the oven and set aside.
2. Open all the candies or candy canes and place them in a thick Ziploc freezer bag. Using a rolling pin or meat mallet crush the candies into small pieces. Do not make it a powder.
3. Choose one type of bark to make at a time. I did my white chocolate chips first. Place chips in a large microwave safe bowl and cook on high for 2-3 minutes. Check the chips and stir to make sure everything is melted.
4. When the chocolate is melted add the crushed candy cane and the almonds. Stir until everything is mixed well and then add mint or almond extract. The traditional recipe calls for only almonds and almond extract. Feel free to combine the flavours as you would like.
5. Pour the mixture out onto a sheet of waxed paper that is laying on a cooking sheet. Place the warm chocolate in the fridge to cool.
6. Repeat steps 1-5 using milk chocolate instead of white. When the bark has cooled remove it from the fridge and gently drop it onto the table. This will break the bark into bite sized pieces. If all else fails I sometimes break the bark apart with my clean hands.
Tuesday, July 24, 2012
Chewy Chocolate Chip Granola Bars
Dear Jess,
We need to Skype soon! I want to hear everything about your honeymoon(s), and how co-habitation is going! Again... I am so excited for you!
I am almost as excited about these granola bars... but obviously not quite that excited. I have tried a couple different recipes over the years, and some have been rather tasty, but usually they are either too dry, too moist, or not yummy enough to bother making them again. This one, however, has won me over! If you are part of a 'peanut-free' school these will not due. I'm sure you could substitute the peanut butter for whatever you're allowed to use instead. Is it true that someone came up with an entirely nut free peanut butter twin but it tasted and looked so much like peanut butter that some schools banned it too in case it was mixed up?! Anyways... the point is: these are delicious.
I found it somewhere on the internet, but for the life of me I cannot find it again... good thing I printed it out!
Chewy Chocolate Chip Granola Bars
1 cup firmly packed brown sugar
2/3 cup peanut butter
1/2 cup liquid honey
1/2 cup butter, melted
2 tsp vanilla extract
3 cups quick-cooking rolled oats
1/2 cup shredded unsweetened coconut
1/2 cup sunflower seeds
1/2 cup craisins
1/2 cup wheat germ
2 tbsp sesame seeds
1 cup dark chocolate chips
1. Preheat oven to 350. Lightly grease 13x9 inch baking pan.
2. In a large bowl, combine brown sugar, peanut butter, honey, melted butter and vanilla and blend well.
3. Stir in remaining ingredients and mix well.
4. Press mixture evenly into prepared pan.
5. Bake for 15-20 minutes or until light golden brown.
6. Cool pan completely on wire rack (or in fridge)
7. Cut bars into desired size and shape.
Oh man. So tasty. Especially as an 'energy-boost' snack. I will be making these again for sure!
Love,
We need to Skype soon! I want to hear everything about your honeymoon(s), and how co-habitation is going! Again... I am so excited for you!
I am almost as excited about these granola bars... but obviously not quite that excited. I have tried a couple different recipes over the years, and some have been rather tasty, but usually they are either too dry, too moist, or not yummy enough to bother making them again. This one, however, has won me over! If you are part of a 'peanut-free' school these will not due. I'm sure you could substitute the peanut butter for whatever you're allowed to use instead. Is it true that someone came up with an entirely nut free peanut butter twin but it tasted and looked so much like peanut butter that some schools banned it too in case it was mixed up?! Anyways... the point is: these are delicious.
I found it somewhere on the internet, but for the life of me I cannot find it again... good thing I printed it out!
Chewy Chocolate Chip Granola Bars
1 cup firmly packed brown sugar
2/3 cup peanut butter
1/2 cup liquid honey
1/2 cup butter, melted
2 tsp vanilla extract
3 cups quick-cooking rolled oats
1/2 cup shredded unsweetened coconut
1/2 cup sunflower seeds
1/2 cup craisins
1/2 cup wheat germ
2 tbsp sesame seeds
1 cup dark chocolate chips
1. Preheat oven to 350. Lightly grease 13x9 inch baking pan.
2. In a large bowl, combine brown sugar, peanut butter, honey, melted butter and vanilla and blend well.
3. Stir in remaining ingredients and mix well.
4. Press mixture evenly into prepared pan.
5. Bake for 15-20 minutes or until light golden brown.
6. Cool pan completely on wire rack (or in fridge)
7. Cut bars into desired size and shape.
Oh man. So tasty. Especially as an 'energy-boost' snack. I will be making these again for sure!
Love,
Labels:
chocolate,
cranberries,
hearty,
peanut butter,
simple,
snack,
sweet,
vanilla
Tuesday, March 6, 2012
Granola Energy Bites
Dear Jess,
Your last post made me salivate! I have been craving Chicken Parmesan for a couple months now! I think I crave these things when it gets cold.
Here is another little fun thing to make. They are from Eat Shrink and be Merry. They're called 'Goody Two Chews' and they're awesome! I made them because I was bored, and it gave me an excuse to visit the new Bulk Barn that opened this passed Friday. Jason has taken a couple of these treats to work in his lunch every day since!
I will be making these often for sure! I might even turn them into granola bars... with the possibility of dipping them in dark chocolate and/or peanut butter! The possibilities are endless!
Love,
Your last post made me salivate! I have been craving Chicken Parmesan for a couple months now! I think I crave these things when it gets cold.
Here is another little fun thing to make. They are from Eat Shrink and be Merry. They're called 'Goody Two Chews' and they're awesome! I made them because I was bored, and it gave me an excuse to visit the new Bulk Barn that opened this passed Friday. Jason has taken a couple of these treats to work in his lunch every day since!
Goody Two Chews
adapted from Eat, Shrink and be Merry by Janet and Greta Poldeski
1/3 cup light peanut butter
1/3 cup pure maple syrup
2 egg whites
1 tsp pumpkin pie spice
1 1/2 cups low-fat granola
3/4 cup dried cranberries
(I also added some mini dark chocolate chips!)
1. Preheat oven to 250F. Spray two 12 cup mini muffin trays and set aside. In a medium bowl, beat together peanut butter and maple syrup on medium speed of electric mixer (I just used a fork.) Add egg whites and pumpkin pie spice and beat again until smooth.
2. Stir in granola and cranberries. Divide mixture evenly among muffin cups. Bake on middle oven rack for 45 minutes
3. Remove from oven and cool completely on wire rack before removing clusters from pan. Store in an airtight container.
Note: I found that mixing wet ingredients in a smaller bowl, and dry ingredients in a bigger bowl and then pouring the wet mixture on top of the dry mixture was easier than the reverse. But to each his/her own!
Also... the book gives you a tip. Don't use overly sweet granola. These babies are going to be sweet enough! I just got the plain low-fat granola from The Bulk Barn with no added dried fruits etc.
Love,
Labels:
breakfast,
chocolate,
cookies,
cranberries,
easy,
hearty,
peanut butter,
simple,
snack
Tuesday, December 13, 2011
Looking Back: The Favourites of 2011
Dear Faithful Readers,
It is that time of year again. As January 1st sneaks up on us, we are given these few relaxing moments to reflect on the year that is about to close behind us.
Many things have happened in these past 12 months that neither of us dreamed would come to be. Jess moved to a different city, received a real teaching position, and got engaged! Sally did her first 30 Day Hot Yoga Challenge, started learning Spanish, and successfully paid off half her student loan (and is still going strong!) Throughout everything we bonded and celebrated together. We also were blessed with an amazing community willing to give as much support, encouragement and love as we needed in whatever form they could. We are truly blessed, and inspired by you all.
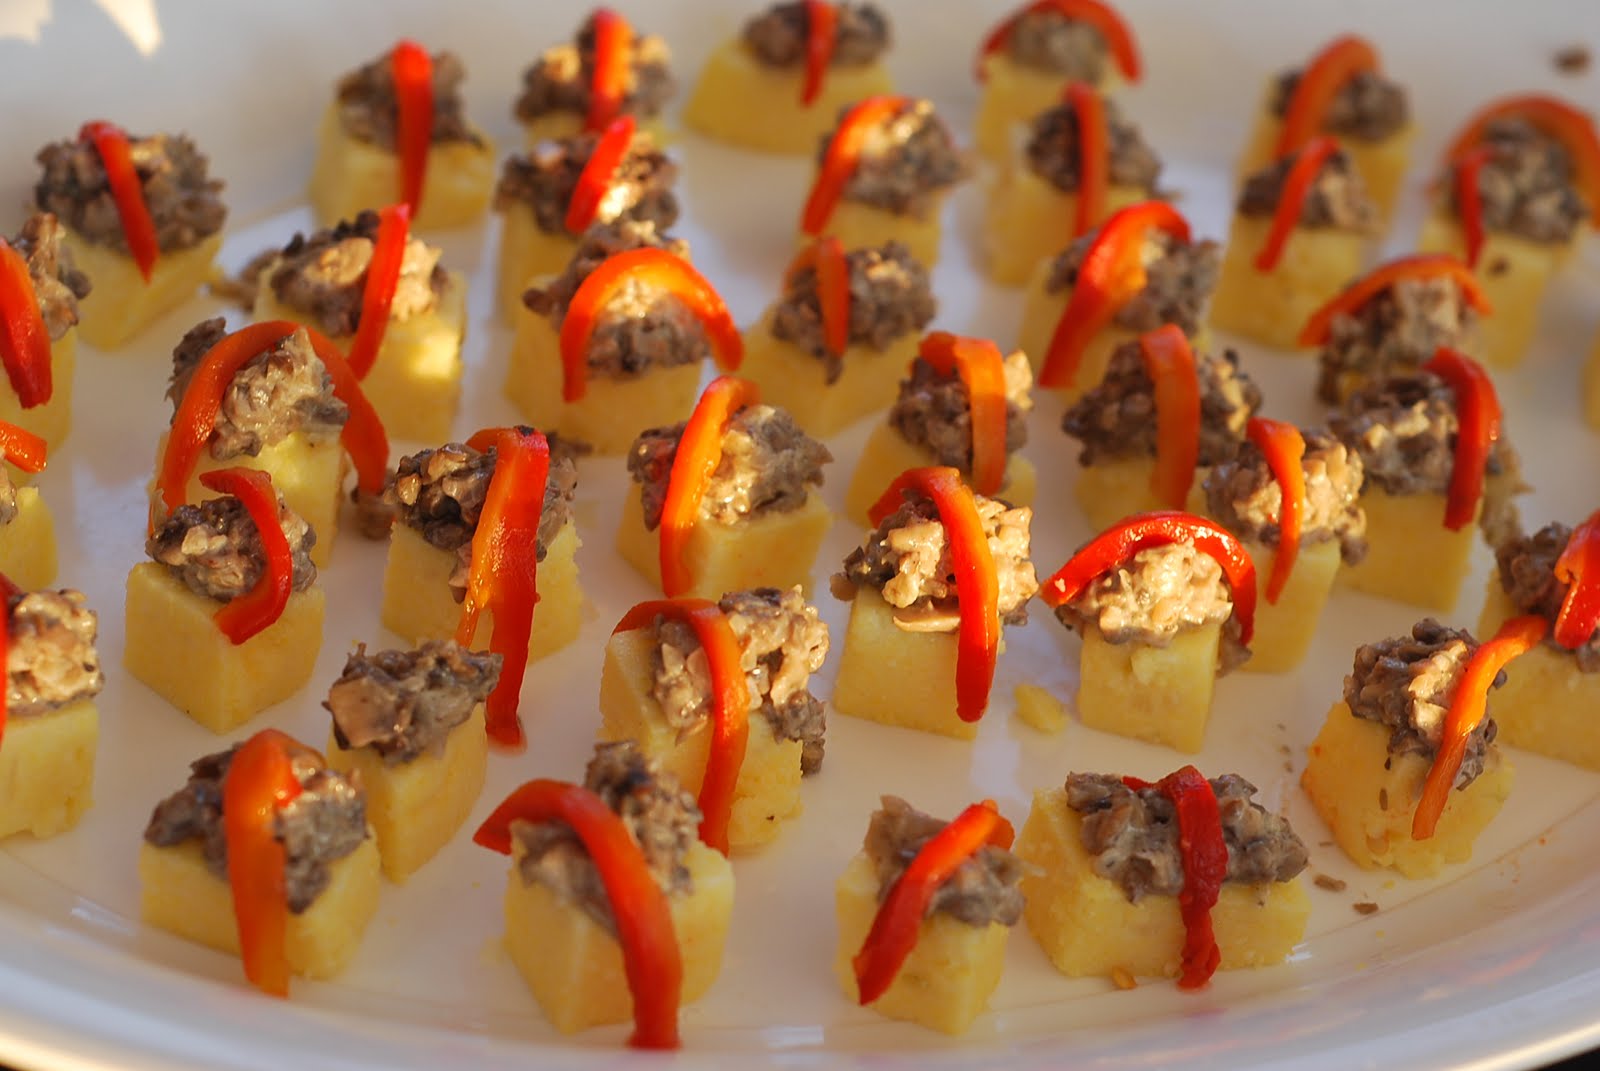
In this post you will find your top 10 favourite recipes of 2011 (plus a couple of our favourites that didn't make the list). We wish you all a Merry Christmas and a Happy New Year.
Jessica's Favourite of 2011: Sweet Potato Skins, Mushroom Polenta Diamonds, and Flourless Chocolate Cake
From MarthaStewart.com
Sally's Favourite of 2011: The Olé Burger
It is that time of year again. As January 1st sneaks up on us, we are given these few relaxing moments to reflect on the year that is about to close behind us.
Many things have happened in these past 12 months that neither of us dreamed would come to be. Jess moved to a different city, received a real teaching position, and got engaged! Sally did her first 30 Day Hot Yoga Challenge, started learning Spanish, and successfully paid off half her student loan (and is still going strong!) Throughout everything we bonded and celebrated together. We also were blessed with an amazing community willing to give as much support, encouragement and love as we needed in whatever form they could. We are truly blessed, and inspired by you all.
In this post you will find your top 10 favourite recipes of 2011 (plus a couple of our favourites that didn't make the list). We wish you all a Merry Christmas and a Happy New Year.
From Food and Drink Summer 2011
From the brilliance of Jess Koning's Creativity
From Food and Drink Autumn 2011
From The New Brooklyn Cookbook, Page 116-118
From this link
From this link
From BBC Good Food and this link
From Jamie's America, Page 308
From Jamie's Italy, or JamieOliver.com
From Jamie's Meals in Minutes
Jessica's Favourite of 2011: Sweet Potato Skins, Mushroom Polenta Diamonds, and Flourless Chocolate Cake
From MarthaStewart.com
Sally's Favourite of 2011: The Olé Burger
From Food and Drink Summer 2011
God Bless,
Labels:
beef,
bread,
burger,
cake,
chocolate,
cinnamon,
cookies,
ice cream,
Jamie Oliver,
lamb,
polenta,
potatoes,
sausage,
spinach,
sweet potatoes
Friday, November 25, 2011
Christmas Bliss: Espresso-Chocolate Shortbread Cookies
To the future Mrs. Jessica Brickell,
Since your relationship status has been changed on Facebook, I am going to assume that I can officially say CONGRATULATIONS ON YOUR ENGAGEMENT! I am soooo thrilled for you both. You two make an amazing team and I am so excited to have shared in the first few moments after the proposal, and am looking forward to the excitement of wedding planning, and of course supporting and encouraging your future journey together. ... Have I mentioned that I am excited yet?!
So, on top of your exciting news, I have just realized how quickly Christmas is creeping up on us. I have decided (again) that most of my gifts will be homemade. Last night I decided to try this new recipe because - let's face it - I saw the recipe on my friend's blog Graceful Oven and almost melted in my seat. I thought to myself 'If these are as sublime as they sound then they will make perfect gifts!'
The ingredients are easy to get. I thought it would be difficult to find Instant Espresso, but there it was in the instant coffee section in Independent. When I went through the check out there was this adorable middle-aged cashier with an English accent who was intrigued with the Instant Espresso. She said she had never seen it before. Terrified that she would think I was actually going to drink the stuff and think it's good espresso, I quickly said I was using it for baking. Well this got her very excited and we spent a good 5 minutes (to the annoyance of the man in a backwards baseball cap in line behind me) about Christmas baking and what else you could incorporate Instant Espresso into. So, long story short, the Instant Espresso created an Instant Friendship that would never have happened otherwise. Trying new things is beneficial for all!
I used my mom's stand mixer. So I could actually mix a batch of these puppies in 8 minutes - from dropping the first ingredients into the mixer to putting the final dough into the fridge. (I made two batches because the first took so short of a time. We actually timed the second batch for fun.)
My friend got this recipe from another blog, and that girl made a groundbreaking suggestion: Why not try Toffee-Coffee Shortbread instead of Chocolate-Coffee Shortbread? So while going through my cupboards looking for the chocolate chips what do you think I found? That's right! A whole bag of toffee chips! That is the story of how my second batch became Toffee-Coffee Shortbread Cookies.
Espresso-Chocolate Shortbread Cookies
makes 42 cookies
1 tbsp instant espresso powder
1 tbsp boiling water
2 x 8oz sticks unsalted butter, at room temperature
2/3 cup confectioners' sugar
1/2 tsp pure vanilla extract
2 cups all-purpose flour
4oz bitter sweet chocolate, finely chopped, or 3/4 cup store-bought mini chocolate chips (or toffee bits!)
Confectioners' sugar, for dusting (optional)
1. Dissolve the espresso in the boiling water, and set aside to cool to tepid.
2. Working with a stand mixer, preferably fitted with a paddle attachment, or with a hand mixer in a large bowl, beat the butter and confectioners' sugar together on medium speed for about 3 minutes, until the mixture is very smooth. Beat in the vanilla and espresso, then reduce the mixer speed to low and add the flour, mixing only until it disappears into the dough. Don't work the dough much once the flour is incorporated. Fold in the chopped chocolate with a sturdy rubber spatula.
3. Using the spatula, transfer the soft, sticky dough to a gallon-size zipper-lock plastic bag. Put the bag on a flat surface, leaving the top open, and roll the dough into a 9 x 10 1/2 inch rectangle that's 1/4 inch thick. As you roll, turn the bag occasionally and lift teh plastic from teh dough so it doesn't cause creases. When you get the right size and thickness, seal the bag, pressing out as much air as possible, and refrigerate the dough for at least 2 hours, or for up to 2 days.
4. Position the racks to divide the oven into thirds and preheat the oven to 325 degrees F. Line two baking sheets with parchment or silicone mats.
5. Put the plastic bag on a cutting board and slit it open. Turn the firm dough out onto the board (discard the bag) and, using a ruler as a guide adn a sharp knife, cut the dough into 1 1/2 inch squares. Transfer the squares to the baking sheets and carefully prick each one twice with a fork, gently pushing the tines through the cookies until they hit the sheet.
6. Bake for 18-20 minutes, rotating hte sheets from top to bottom and front ot back at the midway point. The shortbreads will be pale - they shouldn't take on much color. Transfer the cookies to the rack.
7. If you'd like, dust the cookies with confectioners' sugar while they are still hot. Cool the cookies to room temperature before serving.
And there you go! Christmas presents for all! I baked mine a couple minutes too long. The next batch I will do for only 15 minutes (in a convection oven). I really really really love the concept of rolling the dough in the Ziplock bag. The dough gets so firm, that you can cut it out of the bag and cut off as many squares as you need for that day, and then transfer the rest of it into a new bag and put it back in the fridge! I still have 1/2 of each batch in the fridge to bake again tonight! And let me tell you... the smell that goes through the house when these babies are in the oven is absolutely heavenly! They should make candles that smell like these cookies!
I love you so much. I can't wait for our weekend coming up. Good luck with all your lesson planning and ... report cards? Is it that time of year or am I making it up?
All My Love,
Since your relationship status has been changed on Facebook, I am going to assume that I can officially say CONGRATULATIONS ON YOUR ENGAGEMENT! I am soooo thrilled for you both. You two make an amazing team and I am so excited to have shared in the first few moments after the proposal, and am looking forward to the excitement of wedding planning, and of course supporting and encouraging your future journey together. ... Have I mentioned that I am excited yet?!
So, on top of your exciting news, I have just realized how quickly Christmas is creeping up on us. I have decided (again) that most of my gifts will be homemade. Last night I decided to try this new recipe because - let's face it - I saw the recipe on my friend's blog Graceful Oven and almost melted in my seat. I thought to myself 'If these are as sublime as they sound then they will make perfect gifts!'
The ingredients are easy to get. I thought it would be difficult to find Instant Espresso, but there it was in the instant coffee section in Independent. When I went through the check out there was this adorable middle-aged cashier with an English accent who was intrigued with the Instant Espresso. She said she had never seen it before. Terrified that she would think I was actually going to drink the stuff and think it's good espresso, I quickly said I was using it for baking. Well this got her very excited and we spent a good 5 minutes (to the annoyance of the man in a backwards baseball cap in line behind me) about Christmas baking and what else you could incorporate Instant Espresso into. So, long story short, the Instant Espresso created an Instant Friendship that would never have happened otherwise. Trying new things is beneficial for all!
I used my mom's stand mixer. So I could actually mix a batch of these puppies in 8 minutes - from dropping the first ingredients into the mixer to putting the final dough into the fridge. (I made two batches because the first took so short of a time. We actually timed the second batch for fun.)
My friend got this recipe from another blog, and that girl made a groundbreaking suggestion: Why not try Toffee-Coffee Shortbread instead of Chocolate-Coffee Shortbread? So while going through my cupboards looking for the chocolate chips what do you think I found? That's right! A whole bag of toffee chips! That is the story of how my second batch became Toffee-Coffee Shortbread Cookies.
Espresso-Chocolate Shortbread Cookies
makes 42 cookies
1 tbsp instant espresso powder
1 tbsp boiling water
2 x 8oz sticks unsalted butter, at room temperature
2/3 cup confectioners' sugar
1/2 tsp pure vanilla extract
2 cups all-purpose flour
4oz bitter sweet chocolate, finely chopped, or 3/4 cup store-bought mini chocolate chips (or toffee bits!)
Confectioners' sugar, for dusting (optional)
1. Dissolve the espresso in the boiling water, and set aside to cool to tepid.
2. Working with a stand mixer, preferably fitted with a paddle attachment, or with a hand mixer in a large bowl, beat the butter and confectioners' sugar together on medium speed for about 3 minutes, until the mixture is very smooth. Beat in the vanilla and espresso, then reduce the mixer speed to low and add the flour, mixing only until it disappears into the dough. Don't work the dough much once the flour is incorporated. Fold in the chopped chocolate with a sturdy rubber spatula.
3. Using the spatula, transfer the soft, sticky dough to a gallon-size zipper-lock plastic bag. Put the bag on a flat surface, leaving the top open, and roll the dough into a 9 x 10 1/2 inch rectangle that's 1/4 inch thick. As you roll, turn the bag occasionally and lift teh plastic from teh dough so it doesn't cause creases. When you get the right size and thickness, seal the bag, pressing out as much air as possible, and refrigerate the dough for at least 2 hours, or for up to 2 days.
4. Position the racks to divide the oven into thirds and preheat the oven to 325 degrees F. Line two baking sheets with parchment or silicone mats.
5. Put the plastic bag on a cutting board and slit it open. Turn the firm dough out onto the board (discard the bag) and, using a ruler as a guide adn a sharp knife, cut the dough into 1 1/2 inch squares. Transfer the squares to the baking sheets and carefully prick each one twice with a fork, gently pushing the tines through the cookies until they hit the sheet.
6. Bake for 18-20 minutes, rotating hte sheets from top to bottom and front ot back at the midway point. The shortbreads will be pale - they shouldn't take on much color. Transfer the cookies to the rack.
7. If you'd like, dust the cookies with confectioners' sugar while they are still hot. Cool the cookies to room temperature before serving.
And there you go! Christmas presents for all! I baked mine a couple minutes too long. The next batch I will do for only 15 minutes (in a convection oven). I really really really love the concept of rolling the dough in the Ziplock bag. The dough gets so firm, that you can cut it out of the bag and cut off as many squares as you need for that day, and then transfer the rest of it into a new bag and put it back in the fridge! I still have 1/2 of each batch in the fridge to bake again tonight! And let me tell you... the smell that goes through the house when these babies are in the oven is absolutely heavenly! They should make candles that smell like these cookies!
I love you so much. I can't wait for our weekend coming up. Good luck with all your lesson planning and ... report cards? Is it that time of year or am I making it up?
All My Love,
Saturday, September 10, 2011
Champagne Birthday
Dear Sally,
Thank you so much for your words of encouragement. Junior Kindergarten is so much fun! My students are so little and have the most wonderful ideas about God’s love and power. I am sure I will have many stories to share over the next ten months.
Your last blog about breakfast sounded absolutely delicious! What a perfect way to start a day! As I mentioned earlier in the week I have accepted the
position of EA in the Grade 8 classroom on Tuesdays and Thursdays. They are a wonderful bunch of 33 students and I am blessed to be working with them as well as my own students. Between the two grades I am keeping quite busy so I am very glad to have some time this morning to write about your 25th birthday. It was a pleasure to be able to work with your parents to plan this special evening with you. I have truly enjoyed our friendship and cannot wait for the things that are to come in our lives. Thank you for letting me share your joys, fears, anger and tears. I love you!
For those of you who were not able to join us for S
ally’s party I will try to do my best to explain the extravagant spread that we laid out for all. I wanted to feature as many gluten-free items as possible and if you know food at all you will know that this can sometimes be a challenge! We had cheesy and flaky cheese straws smother
ed in a two-year-old cheddar. For those who enjoy a little dipping action while they eat I sliced two fresh breadsticks in to large chunks and hollowed out the middle. This allowed me to fill the bread with sliced vegetables and dip. Beside these were copious amounts of the mushroom polenta squares. These small delightful treats
– I am told – were a delicious little pop-in-your-mouth treat combining savory mushroom flavours with a hint of sharp cheddar and roasted red pepper topper. Of all the foods featured that night I have to confess that I am most proud of the flourless chocolate cake. A small piece is all you need of these tasty treat but it is well worth the wait.
Easy Flourless Chocolate Cake with Silky Chocolate Glaze
Ingredients:
6 1-ounce squares coarsely chopped semisweet chocolate
1/2 cup (1 stick) unsalted butter
3/4 cup sugar
3 large eggs
1/2 cup cocoa
1/4 teaspoon salt
1 teaspoon vanilla
For Glaze:
2 1-ounce squares coarsely chopped semisweet chocolate squares
1 1/2 tablespoons unsalted butter
1 1/2 teaspoon milk OR light coconut milk
1 1/2 teaspoons Agave syrup OR honey
1/8 teaspoon vanilla
Directions:
1. Preheat oven to 350°F
2. Spray a 7-inch tart pan with removable bottom with cooking spray. If you don't have a tart pan, use a 6 to 7-inch springform pan. Line the bottom of the pan with parchment paper and spray the paper.
3. Melt 6 ounces of chopped chocolate and butter in a heavy saucepan over medium low heat. Stir until chocolate and butter are melted and smooth.
4. Add sugar and salt and reduce heat to low. Cook while stirring for about one minute, until sugar starts to dissolve.
5. Remove pan from heat. Whisk in eggs, one at a time. The mixture will look smooth and glossy.
6. Use a mesh hand sieve to sift cocoa into mixture. This prevents lumps. Whisk until the cake batter is smooth.
7. Pour batter into prepared pan and bake in preheated oven for about 25 minutes. The center of the cake should be just firm to the touch, but be careful to not overbake the cake or it will be dry.
8. Cool in the pan on a wire rack for 15 minutes. Invert the cake on a plate.
9. To prepare the glaze, melt 2 ounces of chopped chocolate and 1 1/2 tablespoons of unsalted butter in the same saucepan you used to make the cake. When melted and smooth, remove the pan from heat. Add milk and Agave syrup OR honey and vanilla and stir until smooth and glossy. Let the glaze cool for about 3 minutes before pouring it on the cake.
9. Pour all of the glaze in the middle of the cake. Use a silicone or rubber spatula to spread the glaze evenly over the cake, allowing the glaze to evenly run down the sides of the cake.
Cheese Straws
1 ¾ cups finely grated sharp cheddar cheese
1 package frozen puff pastry, thawed
2 teaspoons coarse salt
1. Preheat oven to 425 degrees.
2. Sprinkle work surface with ½ cup cheese. Place chilled puff pastry on a work surface and roll out until it is about 1/8 inch thin. Trim to a 14-by-16 inch rectabgle. Sprinkle with 1 teaspoon salt and ¾ cup of the cheese.
3. With the long side facing you. Fold in half by bringing the top edge down toward you. Sprinkle with the remaining teaspoon of salt and ½ cup cheese. Using a pizza wheel or a very sharp knife, cut the dough horizontally into 1/2-inch-wide strips. Divide strips between two baking sheets, placing them evenly apart. Holding each end of a dough strip with your fingers, carefully stretch and twist the strip in opposite directions. Repeat process with remaining strips.
4. Bake until golden brown, 12 to 14 minutes. Let straws cool on baking sheet for 5 minutes before transferring to a wire rack to cool completely.
Loaded Sweet-Potato Skins
4 medium sweet potatoes (about 2 pounds total), scrubbed and patted dry
1 tablespoon olive oil
Coarse salt and ground pepper
1/4 cup low-fat buttermilk
1/4 teaspoon sweet paprika, plus more for garnish
4 slices bacon
1/4 cup reduced-fat sour cream
1 scallion, sliced, for garnish
1. Preheat oven to 450 degrees. On a rimmed baking sheet, rub sweet potatoes with oil; season with salt and pepper. Bake until tender, 40 to 45 minutes. Let cool on sheet (keep oven on).
2. Halve sweet potatoes lengthwise; scoop out 1/3 cup flesh from each half into a medium bowl. Add buttermilk and paprika to bowl. Mash until smooth; season with salt and pepper. Stuff sweet-potato skins with filling. (To store, refrigerate, up to 2 days.)
3. Arrange sweet-potato skins on sheet; bake until lightly browned around edges, about 15 minutes.
4. Meanwhile, in a skillet, cook bacon over medium until crisp, 5 to 8 minutes. Drain on a paper-towel-lined plate; crumble. Stir together sour cream and 2 tablespoons water; drizzle over sweet-potato skins. Garnish with bacon, paprika, and scallion; cut in half to serve.
Mushroom-Polenta Diamonds
6 ounces shiitake mushrooms, stems removed, and caps wiped clean
1 tablespoon unsalted butter, plus more for baking sheet
1 small onion, minced
2 tablespoons port or dry white wine
6 tablespoons heavy cream
1 teaspoon coarse salt, plus more for seasoning
Freshly ground pepper
1 cup instant polenta
1/2 cup freshly grated Parmesan cheese (2 ounces)
2 roasted red bell peppers, cut into thin slivers, for garnish (optional)
Mascarpone cheese, for garnish (optional)
1. In a food processor, pulse mushrooms until finely chopped. Melt butter in a medium skillet over medium heat. Add onion; cook, stirring occasionally, until softened, about 4 minutes. Add mushrooms; cook until softened, about 3 minutes. Add port, and stir until evaporated. Stir in cream; simmer until mixture is thick, about 3 minutes. Season with salt and pepper. Remove from heat; let cool.
2. Butter a 10-by-15-inch rimmed baking sheet; set aside. Boil 1 quart water in a large saucepan; add 1 teaspoon salt. While whisking constantly, gradually add polenta. Reduce heat to a simmer; cook, whisking constantly, until soft and all water is absorbed, about 5 minutes. Stir in Parmesan. Immediately transfer to prepared baking sheet; spread evenly. Let cool completely; cover with plastic wrap, and refrigerate until ready to proceed. Polenta can be made up to 1 day ahead.
3. Halve the polenta crosswise. Carefully transfer one half, smooth side down, to a clean work surface; spread mushroom mixture on top. Place remaining polenta half, smooth side up, on top; trim edges.
4. Cut polenta lengthwise into 3/4-inch-wide rows; cut rows at an angle to form 1-inch-long diamonds. Place on parchment-lined baking sheets. Wrap in plastic wrap; freeze until ready to use, up to 6 weeks.
5. To serve, preheat oven to 425 degrees. Transfer sheets to oven. Bake diamonds, rotating sheets halfway through, 12 to 15 minutes. Garnish each with bell pepper and a dab of mascarpone, if desired. Serve warm.
Subscribe to:
Posts (Atom)