Dear Jess,
This is a new staple recipe for future potlucks, baby showers, bridal showers, tea times... any time...
While at Mary Austin's house, visiting before her Pampered Chef party, she showed me a cookbook she signed out from the library. Jerusalem: A Cookbook by Yotam Ottolenghi and Sami Tamimi. I am seriously considering buying this beautiful book. It is so well laid out, and the photos are gorgeous. It makes you want to eat every single dish in you see in this book.
Since I offered to bring a dip with veggies and/or crackers for a baby shower that was coming up, I decided to copy this recipe from the book. I don't have the page number with me, but if you buy the book, it will be in there... I promise!
I don't think I was expecting this to be anything special. I thought it would be yummy, but a 'whatever-I'll-make-it-this-one-time' recipe. This is one situation where I am always glad to be entirely wrong! This spread is sweet, with a thick texture. It was delicious on sesame rice crackers, but would also be amazing as a spread on a sandwich or wrap!
Also, this makes a LOT of spread. The picture shows about a third of the amount, and I put it on my large dinner plate! But not to worry! It keeps well in the fridge!
Butternut Squash and Tahini Spread
from Jerusalem: A Cookbook by Yotam Ottolenghi and Sami Tamimi
1 very large butternut squash (about 2 1/2lb), peeled and cut into chunks (about 7 cups in total)
3 Tbsp olive oil
1 tsp ground cinnamon
5 Tbsp light Tahiti paste
1/2 cup Greek yogurt
2 small cloves garlic, crushed
1 tsp mixed black and white sesame seeds (or just white, if you don't have black)
1 1/2 tsp date syrup (or maple syrup or molasses)
salt
Preheat the oven to 400F/200C
Spread the squash out in a medium roasting pan. Pour over the olive oil and sprinkle on the cinnamon and 1/2 tsp salt. Mix together well, cover the pan tightly with aluminum foil, and roast in the oven for 70 minutes, stirring once during the cooking. Remove from the oven and leave to cool.
Transfer the squash to a food processor, along with the Tahiti, yogurt, and garlic. Roughly pulse so that everything is combined into a coarse paste, without the spread becoming smooth; you can also do this by hand using a fork or potato masher.
Spread the butternut in a wavy pattern over a flat plate and sprinkle with the sesame seeds, drizzle over the syrup, and finish with the cilantro, if using.
I really do hope you get a chance to make this! The flavours and textures all have a party in your mouth with every bite! Mmmmmmmm... I need to make this again... and soon!
Love,
Showing posts with label appetizers. Show all posts
Tuesday, March 10, 2015
Monday, April 1, 2013
Bacon Appetizers and Muffin Sized Lasagna
Good Morning, and Happy Easter Monday!
I hope your weekend was wonderful, and you were able to get outside and enjoy the beautiful Spring weather! It was snowing a little bit this morning (in typical April style), but the sun has now come out and it's looking like a cheerful day!
We celebrated my Mom's birthday this weekend, and Jason and I had the whole family over for dinner. Including significant others... this was a total of 10 people! We set up our living room with our 2 tables and had a lovely time!
Kristy came over to help me (which was awesome!) and the night was a success (company, food, atmosphere... everything!)
I will be sharing two of these recipes with you today.
Bacon wrapped Dates
from Caitlin, who made them for Jason and me the last time we visited
Pitted Dates
Bacon, cut in half
Goat Cheese
Almonds
Toothpicks (sturdy ones)
1. Place one almond and a chunk of Goat cheese inside the date. Wrap in half a piece of bacon. Stab with a toothpick. Pace in a greased casserole dish.
2. Bake at 400F for 15-20 minutes. Let cool for 5 minutes.
3. Serve.
Always make more than you think you will need! Though they sound weird... they are so delicious!
Muffin Sized Lasagna
adapted from tablespoon.com
1/3 pound extra lean ground beef
salt and pepper
24 wonton wrappers
1 3/4 cup (7oz) freshly grated Parmesan Cheese
1 3/4 cup (7oz) grated Mozzarella Cheese (I used marbled)
3/4 cup (3oz) Ricotta Cheese
1 cup Pasta Sauce
Fresh Basil for Garnish (optional)
1. Preheat oven to 375F. DO NOT spray muffin trays!
2. Brown beef, and season with salt and pepper. (I added seasonings to my beef.) Drain.
3. Reserve 3/4 cup Parmesan Cheese and 3/4 cup mozzarella cheese for the top of your lasagnas. Start layering your lasagna. Begin with a wonton wrapper and press it into the bottom of each muffin tin. Sprinkle a little Parmesan cheese, ricotta cheese, and mozzarella cheese in each. top with a little meat and pasta sauce.
4. Repeat layers again (i.e. wonton, Parmesan, ricotta, mozzarella, and pasta sauce). Top with reserved Parmesan and mozzarella cheeses.
5. Bake for 18-20 minutes or until edges are brown. Remove from oven and let cool for 5 minutes. To remove, use a knife to loosen the edges then pop each lasagna out.
6. Garnish with basil and serve.
I hope your weekend was wonderful, and you were able to get outside and enjoy the beautiful Spring weather! It was snowing a little bit this morning (in typical April style), but the sun has now come out and it's looking like a cheerful day!
We celebrated my Mom's birthday this weekend, and Jason and I had the whole family over for dinner. Including significant others... this was a total of 10 people! We set up our living room with our 2 tables and had a lovely time!
Kristy came over to help me (which was awesome!) and the night was a success (company, food, atmosphere... everything!)
The Menu:
Bacon wrapped Dates
Hummus and Flatbread (homemade)
Arugala, Mango and Avocado Salad
Bussels Sprout, Parmesan and Toasted Walnut Salad
Muffin Sized Lasagna
Coconut and Dark Chocolate Cups
Baked Apple Halves
I will be sharing two of these recipes with you today.
Bacon wrapped Dates
from Caitlin, who made them for Jason and me the last time we visited
Pitted Dates
Bacon, cut in half
Goat Cheese
Almonds
Toothpicks (sturdy ones)
1. Place one almond and a chunk of Goat cheese inside the date. Wrap in half a piece of bacon. Stab with a toothpick. Pace in a greased casserole dish.
2. Bake at 400F for 15-20 minutes. Let cool for 5 minutes.
3. Serve.
Always make more than you think you will need! Though they sound weird... they are so delicious!
Muffin Sized Lasagna
adapted from tablespoon.com
1/3 pound extra lean ground beef
salt and pepper
24 wonton wrappers
1 3/4 cup (7oz) freshly grated Parmesan Cheese
1 3/4 cup (7oz) grated Mozzarella Cheese (I used marbled)
3/4 cup (3oz) Ricotta Cheese
1 cup Pasta Sauce
Fresh Basil for Garnish (optional)
1. Preheat oven to 375F. DO NOT spray muffin trays!
2. Brown beef, and season with salt and pepper. (I added seasonings to my beef.) Drain.
3. Reserve 3/4 cup Parmesan Cheese and 3/4 cup mozzarella cheese for the top of your lasagnas. Start layering your lasagna. Begin with a wonton wrapper and press it into the bottom of each muffin tin. Sprinkle a little Parmesan cheese, ricotta cheese, and mozzarella cheese in each. top with a little meat and pasta sauce.
4. Repeat layers again (i.e. wonton, Parmesan, ricotta, mozzarella, and pasta sauce). Top with reserved Parmesan and mozzarella cheeses.
5. Bake for 18-20 minutes or until edges are brown. Remove from oven and let cool for 5 minutes. To remove, use a knife to loosen the edges then pop each lasagna out.
6. Garnish with basil and serve.
These are so yummy and so easy to adapt to individual tastes! This recipe makes 12... Kristy and I made 48. Half of the meat we seasoned with Thyme, Basil and Oregano. The other half we used Chili Powder, Cumin and Red Pepper flakes. They taste amazing the next day as well! Very good recipe to have!
Lots of Love,
Labels:
appetizers,
bacon,
beef,
cheese,
comfort food,
goat cheese,
simple,
snack
Friday, December 21, 2012
Hot Roasted Artichoke Dip with Spinach and Asiago Cheese with Herbed Pita Chips
Dear Jess,
Oh man. Christmas is fast approaching, and the 'party food' lists are being completed.
Last night my cousin Mark came for a visit. He is visiting from Alberta until Christmas. Last time he visited I completely ran out of time, and couldn't get together anything worth serving. The chips were stale, the coffee was week, I had to ask someone to pick up veggie dip for the few veggies I had in my fridge... It wasn't tasty. It wasn't pretty. Basically, it was something from my nightmares. I decided to do a 're-do'.
This time I had a beautiful, large veggie tray with dip, some chocolate dipped pretzels, and this artichoke dip with pita crisps that I seasoned and made crispy in the oven. We demolished everything! It was so delicious! And just for the record, I had fresh ground non-weak coffee, tea, eggnog, beer, wine and juice to serve for beverages. I think I redeemed myself.
I have decided to pay closer attention to my 'kitchen inventory' these days. It is forcing me to take into account what I already have, and try to find recipes that include said items. This Artichoke Dip is a result of this searching. I had a can of artichokes left over from some other recipe I tried quite a while ago. Needless to say, I'm glad I did! As mentioned before, we demolished this dip! And this is saying something, because this recipe makes a fair amount of it!
Hot Roasted Artichoke Dip with Spinach & Asiago Cheese
from The Looneyspoons Collections by Janet and Greta Podleski, Hearty-Choke Dip, Page 4
1 can (14oz/398mL) artichoke hearts (not marinated)
1/2 large yellow sweet onion, coarsely chopped
3 large cloves garlic, peeled and cut into thirds
1 tbsp olive oil
Salt and freshly ground black pepper to taste
1 can (19oz/540mL) no-salt-added white kidney beans, drained and rinsed
1 cup light (5%) sour cream (I used Fat Free)
1 tub (8oz/250mL) light garden vegetable cream cheese (such as Philadelphia brand)
1/2 tsp grated lemon zest
4 or 5 dashes hot pepper sauce
1/2 pkg (10 oz/300g) frozen spinach, thawed, squeezed dry and chopped (I used the whole 10 oz package. I love spinach!)
1 cup packed shredded Asiago cheese, divided (You can use Parmesan or Romano cheese instead. I used a combination of the three.)
1. Preheat oven to 425F
2. Drain artichokes and pat dry using paper towels. Cut artichokes in half. Place artichokes in a small casserole dish or baking pan. Add chopped onions and garlic. Drizzle with olive oil and sprinkle lightly with salt and pepper. Mix well. Roast uncovered for 30 minutes, stirring once, halfway through roasting time.
3. While vegetables are roasting, place kidney beans, sour cream, cream cheese, lemon zest and hot pepper sauce in the bowl of a food processor*. Whirl until smooth.
4. Remove artichoke mixture from oven. Reduce oven temperature to 375F. Let vegetables cool for 5 minutes, then add to ingredients in food processor. Pulse on and off until mixture is well blended but still slightly lumpy. Transfer artichoke mixture to a bowl and stir in spinach, a pinch of black pepper and all but 2 tbsp Asiago cheese. Spoon mixture back into casserole dish. Top with remaining 2 tbsp asiago cheese.
5. Bake uncovered on middle oven rack for 30 minutes, until mixture bubbles around the edges and top turns a light golden brown. Remove from oven and let cool for 5 minutes before serving. It's hot! Serve with whole-grain pita chips or crackers.
*I don't have a food processor, so I just used my blender.
Pita Chips
adapted from allrecipes.com
4-5 whole wheat pita breads
1/2 cup olive oil
1/2 tsp fresh ground black pepper
1 tsp garlic powder
1/2 tsp dried basil
1 tsp dried parsley
1. Preheat oven to 400F.
2. Cut all pita bread into whatever sizes/shapes you want your chips to be. Place them on a lined cookie sheet.
3. In a small bowl combine the remaining ingredients and mix well. Brush each pita piece with oil mixture.
4. Bake for 5-7 minutes, or until lightly golden and crispy. Watch carefully, as they brown easily!
I prepared the dip the day before (minus baking it.) Because of this, it was colder from being in the fridge over night, so I baked it for an extra 10 or 15 minutes. It still turned out amazing!
The chips were really yummy. The herbed seasoning was not very strong. They had a nice and subtle taste to them, and made the house smell delicious.
I hope you're not too busy, and you are finding time to relax during your holidays. I miss you and am really excited to see you again (hopefully soon!)
Love,
Oh man. Christmas is fast approaching, and the 'party food' lists are being completed.
Last night my cousin Mark came for a visit. He is visiting from Alberta until Christmas. Last time he visited I completely ran out of time, and couldn't get together anything worth serving. The chips were stale, the coffee was week, I had to ask someone to pick up veggie dip for the few veggies I had in my fridge... It wasn't tasty. It wasn't pretty. Basically, it was something from my nightmares. I decided to do a 're-do'.
This time I had a beautiful, large veggie tray with dip, some chocolate dipped pretzels, and this artichoke dip with pita crisps that I seasoned and made crispy in the oven. We demolished everything! It was so delicious! And just for the record, I had fresh ground non-weak coffee, tea, eggnog, beer, wine and juice to serve for beverages. I think I redeemed myself.
I have decided to pay closer attention to my 'kitchen inventory' these days. It is forcing me to take into account what I already have, and try to find recipes that include said items. This Artichoke Dip is a result of this searching. I had a can of artichokes left over from some other recipe I tried quite a while ago. Needless to say, I'm glad I did! As mentioned before, we demolished this dip! And this is saying something, because this recipe makes a fair amount of it!
Hot Roasted Artichoke Dip with Spinach & Asiago Cheese
from The Looneyspoons Collections by Janet and Greta Podleski, Hearty-Choke Dip, Page 4
1 can (14oz/398mL) artichoke hearts (not marinated)
1/2 large yellow sweet onion, coarsely chopped
3 large cloves garlic, peeled and cut into thirds
1 tbsp olive oil
Salt and freshly ground black pepper to taste
1 can (19oz/540mL) no-salt-added white kidney beans, drained and rinsed
1 cup light (5%) sour cream (I used Fat Free)
1 tub (8oz/250mL) light garden vegetable cream cheese (such as Philadelphia brand)
1/2 tsp grated lemon zest
4 or 5 dashes hot pepper sauce
1/2 pkg (10 oz/300g) frozen spinach, thawed, squeezed dry and chopped (I used the whole 10 oz package. I love spinach!)
1 cup packed shredded Asiago cheese, divided (You can use Parmesan or Romano cheese instead. I used a combination of the three.)
1. Preheat oven to 425F
2. Drain artichokes and pat dry using paper towels. Cut artichokes in half. Place artichokes in a small casserole dish or baking pan. Add chopped onions and garlic. Drizzle with olive oil and sprinkle lightly with salt and pepper. Mix well. Roast uncovered for 30 minutes, stirring once, halfway through roasting time.
3. While vegetables are roasting, place kidney beans, sour cream, cream cheese, lemon zest and hot pepper sauce in the bowl of a food processor*. Whirl until smooth.
4. Remove artichoke mixture from oven. Reduce oven temperature to 375F. Let vegetables cool for 5 minutes, then add to ingredients in food processor. Pulse on and off until mixture is well blended but still slightly lumpy. Transfer artichoke mixture to a bowl and stir in spinach, a pinch of black pepper and all but 2 tbsp Asiago cheese. Spoon mixture back into casserole dish. Top with remaining 2 tbsp asiago cheese.
5. Bake uncovered on middle oven rack for 30 minutes, until mixture bubbles around the edges and top turns a light golden brown. Remove from oven and let cool for 5 minutes before serving. It's hot! Serve with whole-grain pita chips or crackers.
*I don't have a food processor, so I just used my blender.
Pita Chips
adapted from allrecipes.com
4-5 whole wheat pita breads
1/2 cup olive oil
1/2 tsp fresh ground black pepper
1 tsp garlic powder
1/2 tsp dried basil
1 tsp dried parsley
1. Preheat oven to 400F.
2. Cut all pita bread into whatever sizes/shapes you want your chips to be. Place them on a lined cookie sheet.
3. In a small bowl combine the remaining ingredients and mix well. Brush each pita piece with oil mixture.
4. Bake for 5-7 minutes, or until lightly golden and crispy. Watch carefully, as they brown easily!
I prepared the dip the day before (minus baking it.) Because of this, it was colder from being in the fridge over night, so I baked it for an extra 10 or 15 minutes. It still turned out amazing!
The chips were really yummy. The herbed seasoning was not very strong. They had a nice and subtle taste to them, and made the house smell delicious.
I hope you're not too busy, and you are finding time to relax during your holidays. I miss you and am really excited to see you again (hopefully soon!)
Love,
Labels:
appetizers,
beans,
cheese,
onion,
pita,
simple,
snack,
spinach,
vegetarian
Monday, July 30, 2012
Moroccan and Rollin' Quinoa Salad
Dear Jess,
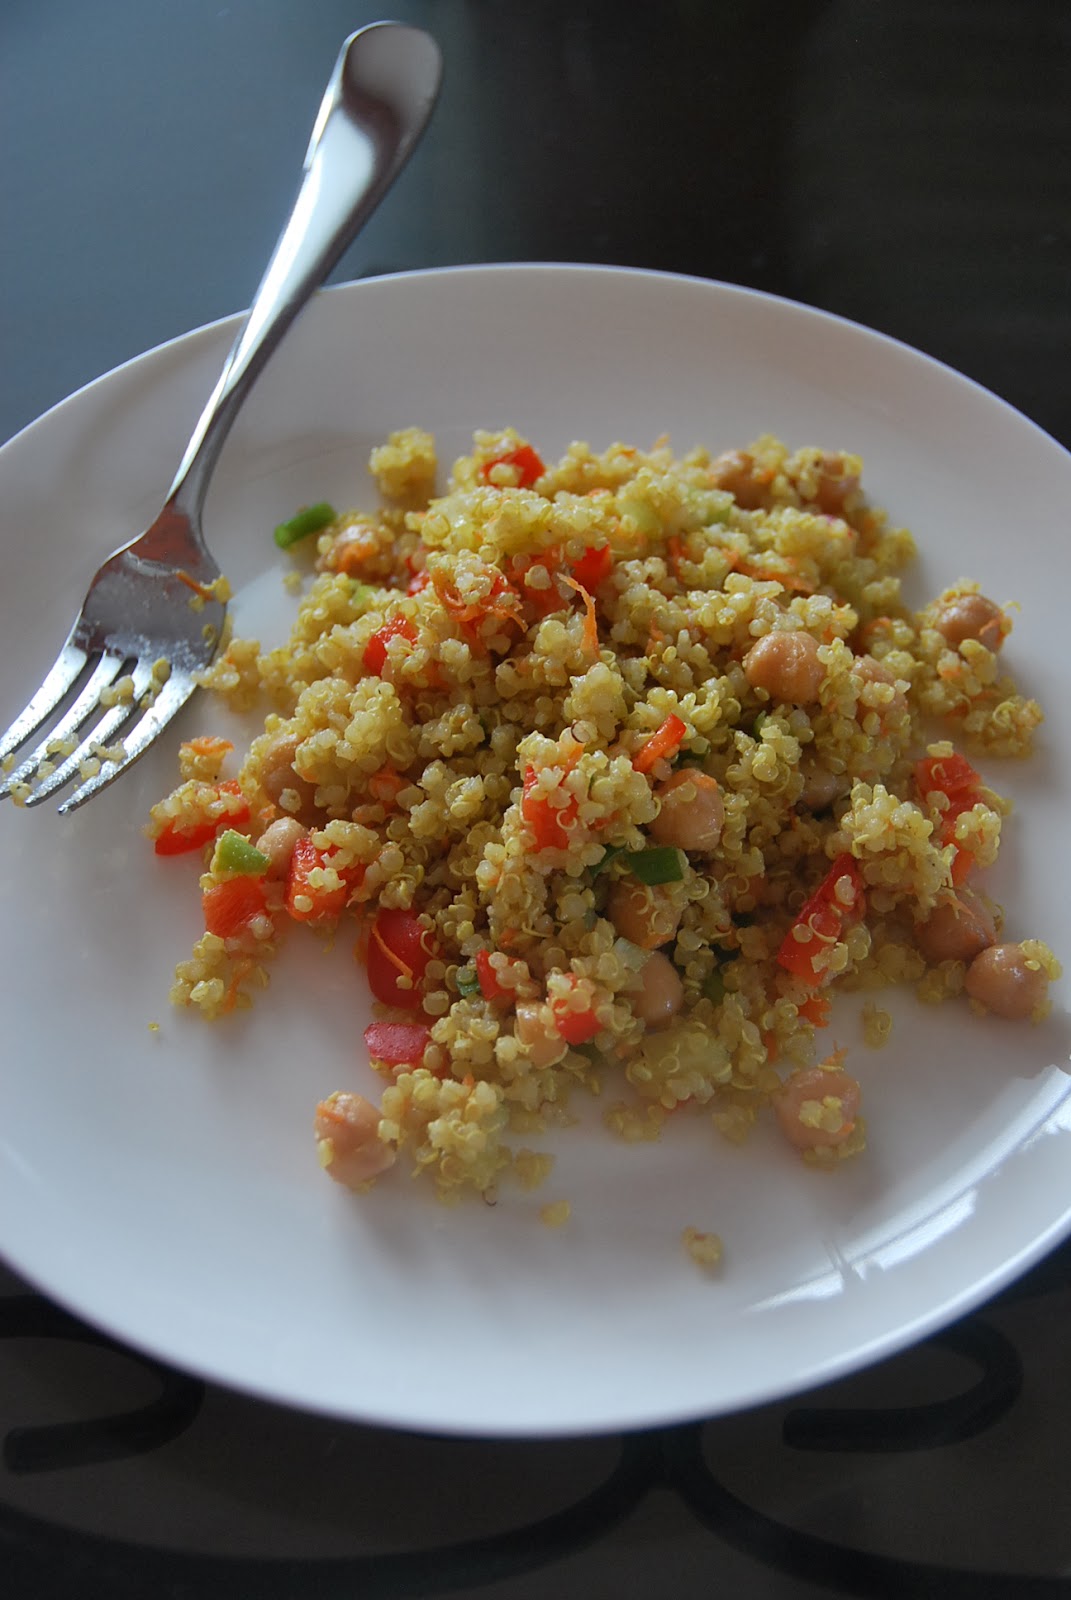
This Quinoa (pronounced keen-wah) Salad is so good that I made it last week and I am right at this minute making it again. As I sit here writing this entry (in our newly painted 'study/office/drawing room',) the Quinoa is in the pot boiling, and the aroma is floating through the house. (I also have bread baking in the bread-maker, so my house basically smells like heaven.) This is another gem from the Podleski sisters (The Looneyspoons Collection.) On page 38 you will find Moroccan and Rollin' Quinoa Salad.
I have fallen in love with this particular seed for many reasons. One being you can do so much with it, another being it's delicious, and most importantly: it is a full protein! Janet and Greta have a nice little description of it that I will share here with you:
"Though commonly referred to as a grain, quinoa is actually a seed of the goosefoot plant, a relative of leafy green vegetables like spinach and Swiss chard. Once considered 'the gold of the Incas,' Aztec warriors used quinoa to increase their stamina. It's not wonder: quinoa is a nutritional powerhouse! It has twice the protein of brown rice and contains all nine essential amino acids (nutritional building blocks that help form proteins and muscle and other tissue) - rare in the plant kingdom. That's why quinoa is winning the popularity contest among vegetarians and others who don't want to eat meal 'til the cows come home. All that protein plus tons of fiber make it a waist-watcher's dream, a diabetic's dream, a cholesterol-lowering dream and... well... a dream come true for anone who wants to put the best possible fuel in their body. The tiny seeds can boost energy and also contain lots of magnesium that can help prevent high blood pressure and osteoporosis. As an added bonus, quinoa is gluten-free, ideal for those with Celiac disease or other grain sensitivities." (page 38 of The Looneyspoons Collection)
So there you go! One major tip when buying quinoa: make sure you get 'prewashed' or 'prerinsed' quinoa. It will say this on the package. If you don't you have to thoroughly strain it.
Moroccan and Rollin' Quinoa Salad
From Janet and Greta Podleski's The Looneyspoons Collection
1 cup uncooked quinoa
2 cups reduced-sodium vegetable broth
1/4 cup dried currants (I didn't do this)
1 tsp curry powder
1 tsp ground cumin
1/2 tsp ground coriander
1 tsp liquid honey
1/2 tsp salt
1 cup canned no-salt-added chickpeas, drained and rinsed
1/2 cup each finely chopped red bell pepper, grated corrotts and peeled, diced English cucumber
1/3 cup chopped green onions
2 tbsp olive oil
2 tbsp freshly squeezed lemon juice
2 tbsp minced fresh mint leaves
1/4/ tsp freshly ground black pepper
1. Combine quinoa, broth, currants, curry, cumin, coriander, honey and salt in a medium pot. Bring to a boil. Reduce heat to low, cover and simmer for about 20 minutes or until quinoa has absorbed all liquid. Remove from heat. Let stand covered for 10 minutes. Fluff with a fork and leave uncovered to cool completely.
2. When quinoa is cool, transfer to large mixing bowl. Stir in all remaining ingredients. Mix will and refrigerate for at least an hour or two before serving. Tastes even better the next day!
This salad I eat most days for lunch and also include some in Jason's lunch. (He loves it!) It will last me about a week. I will likely make a big batch of this before I go to Spain as part of Jason's 'meal plan' that I will be leaving him.
I can't wait to see/talk to you soon. Hopefully before I leave, but if not sometime shortly after I get back.
Love,
Sally*
*(my signature is on my other computer which is giving me some problems lately...)
This Quinoa (pronounced keen-wah) Salad is so good that I made it last week and I am right at this minute making it again. As I sit here writing this entry (in our newly painted 'study/office/drawing room',) the Quinoa is in the pot boiling, and the aroma is floating through the house. (I also have bread baking in the bread-maker, so my house basically smells like heaven.) This is another gem from the Podleski sisters (The Looneyspoons Collection.) On page 38 you will find Moroccan and Rollin' Quinoa Salad.
I have fallen in love with this particular seed for many reasons. One being you can do so much with it, another being it's delicious, and most importantly: it is a full protein! Janet and Greta have a nice little description of it that I will share here with you:
"Though commonly referred to as a grain, quinoa is actually a seed of the goosefoot plant, a relative of leafy green vegetables like spinach and Swiss chard. Once considered 'the gold of the Incas,' Aztec warriors used quinoa to increase their stamina. It's not wonder: quinoa is a nutritional powerhouse! It has twice the protein of brown rice and contains all nine essential amino acids (nutritional building blocks that help form proteins and muscle and other tissue) - rare in the plant kingdom. That's why quinoa is winning the popularity contest among vegetarians and others who don't want to eat meal 'til the cows come home. All that protein plus tons of fiber make it a waist-watcher's dream, a diabetic's dream, a cholesterol-lowering dream and... well... a dream come true for anone who wants to put the best possible fuel in their body. The tiny seeds can boost energy and also contain lots of magnesium that can help prevent high blood pressure and osteoporosis. As an added bonus, quinoa is gluten-free, ideal for those with Celiac disease or other grain sensitivities." (page 38 of The Looneyspoons Collection)
So there you go! One major tip when buying quinoa: make sure you get 'prewashed' or 'prerinsed' quinoa. It will say this on the package. If you don't you have to thoroughly strain it.
Moroccan and Rollin' Quinoa Salad
From Janet and Greta Podleski's The Looneyspoons Collection
1 cup uncooked quinoa
2 cups reduced-sodium vegetable broth
1/4 cup dried currants (I didn't do this)
1 tsp curry powder
1 tsp ground cumin
1/2 tsp ground coriander
1 tsp liquid honey
1/2 tsp salt
1 cup canned no-salt-added chickpeas, drained and rinsed
1/2 cup each finely chopped red bell pepper, grated corrotts and peeled, diced English cucumber
1/3 cup chopped green onions
2 tbsp olive oil
2 tbsp freshly squeezed lemon juice
2 tbsp minced fresh mint leaves
1/4/ tsp freshly ground black pepper
1. Combine quinoa, broth, currants, curry, cumin, coriander, honey and salt in a medium pot. Bring to a boil. Reduce heat to low, cover and simmer for about 20 minutes or until quinoa has absorbed all liquid. Remove from heat. Let stand covered for 10 minutes. Fluff with a fork and leave uncovered to cool completely.
2. When quinoa is cool, transfer to large mixing bowl. Stir in all remaining ingredients. Mix will and refrigerate for at least an hour or two before serving. Tastes even better the next day!
This salad I eat most days for lunch and also include some in Jason's lunch. (He loves it!) It will last me about a week. I will likely make a big batch of this before I go to Spain as part of Jason's 'meal plan' that I will be leaving him.
I can't wait to see/talk to you soon. Hopefully before I leave, but if not sometime shortly after I get back.
Love,
Sally*
*(my signature is on my other computer which is giving me some problems lately...)
Labels:
appetizers,
chickpeas,
curry,
easy,
gluten-free,
hearty,
quinoa,
salad,
simple,
snack,
vegetables,
vegetarian
Tuesday, January 3, 2012
Stuffed Fillet Steak, and Savory Cheese and Bacon Muffins
Dearest Jess,
I hope your holidays have been everything you hoped them to be. I found mine to be busy, but perfectly balanced with relaxation. As always, there were many family dinners, and friends in from out of town. It was all wonderful.
Yesterday was my first day back to work since the 23rd. Jason and I had planned a dinner to make on Sunday night, but other things came up, so it was pushed to last night. We got the recipes from this great book that Robin gave me for my birthday. It's called Mix & Match Meals. To fully appreciate this book you really need to go pick one up. When you open it, the pages are split horizontally in three sections. The top one: appetizers, the middle: entrees, the bottom: desserts. So as you pick which one you want for each stage of your meal, you can flip through all the sections separately and in the end have all three recipes open at the same time. This means the process of making your grocery list is greatly simplified.
The Menu: Stuffed Fillet Steak with chili and parsley butter, with Savory Cheese and Bacon Muffins.
I have mixed feelings about this meal. The muffins were surprisingly amazing. If you make them with whole wheat/grain bread crumbs they become a healthier option. The steak was... interesting. I'm not sure I'm a fan of a cream cheese filling for a steak. Maybe if it was whipped with some fresh herbs and spices? Or spinach? Or feta and/or goat cheese instead? It needed something else. The butter I would put more chili flakes in. That being said, it would be delicious spread on some fresh bread.
All in all, it was a pretty plate.
Savory Cheese and Bacon Muffins
adapted from Mix&Match Meals, Page 108 (starters)
5 1/2 oz (150g) Canadian bacon, sliced
7oz (200g) Cheddar cheese, cut up into small cubes
1 1/4 cups whole wheat/grain bread crumbs
1/2 bunch of scallions, finely chopped
3 eggs
1/2 cup milk
salt and ground black pepper
Pam for greasing
1. Fry the bacon until cooked but not too crispy, then cut into bite-sized pieces. Mix together the cheese with the bread crumbs, scallions, eggs and milk. Stir in the bacon.
2. Season generously with salt and pepper, then spoon into 4 buttered ramekins (or into your muffin trays). Bake in the oven at 375F (190C) for about 25 minutes until risen and golden. Serve hot or cold.
Stuffed Fillet Steak with Chili and Parsley Butter
adapted from Mix&Match Meals, Page 64 (Main Course)
4 sirloin steaks, about 8oz (225g) each, cut to a minimum 1 inch (2.5cm) thick
4 1/2oz (125g) light cream cheese
1 tbsp olive oil
sea salt and freshly ground black pepper
for Chili and Parsley Butter
5 tbsp salted butter
1 tsp hot red pepper flakes
2 tbsp finely chopped flat-leaf parsley leaves
Spinach to serve
1. To make the chili and parsley butter, mix together all the ingredients in a bowl until well combined. Form into a sausage shape, and place in a piece of parchment paper. Roll up into a tube, twist each end of pepper, and chill for 30 minutes.
2. Heat the barbecue until hot. Take each fillet steak and, using a thin pointed knife pierce the side and move the knife from side to side to create a cavity, trying not to increase the size of the opening too much. Place a portion of cream cheese into each opening. Do not over stuff.
3. Grill the steaks on the barbecue over high heat for 3 minutes on each side, turning once. Set on a plate, and let rest for 5 minutes.
4. Serve on top of fresh spinach with a dollop of Chili and Parsley Butter for garnish.
I can't wait to hear about your travels! I hope all is and will continue to go safely.
Love,
I hope your holidays have been everything you hoped them to be. I found mine to be busy, but perfectly balanced with relaxation. As always, there were many family dinners, and friends in from out of town. It was all wonderful.
Yesterday was my first day back to work since the 23rd. Jason and I had planned a dinner to make on Sunday night, but other things came up, so it was pushed to last night. We got the recipes from this great book that Robin gave me for my birthday. It's called Mix & Match Meals. To fully appreciate this book you really need to go pick one up. When you open it, the pages are split horizontally in three sections. The top one: appetizers, the middle: entrees, the bottom: desserts. So as you pick which one you want for each stage of your meal, you can flip through all the sections separately and in the end have all three recipes open at the same time. This means the process of making your grocery list is greatly simplified.
The Menu: Stuffed Fillet Steak with chili and parsley butter, with Savory Cheese and Bacon Muffins.
I have mixed feelings about this meal. The muffins were surprisingly amazing. If you make them with whole wheat/grain bread crumbs they become a healthier option. The steak was... interesting. I'm not sure I'm a fan of a cream cheese filling for a steak. Maybe if it was whipped with some fresh herbs and spices? Or spinach? Or feta and/or goat cheese instead? It needed something else. The butter I would put more chili flakes in. That being said, it would be delicious spread on some fresh bread.
All in all, it was a pretty plate.
Savory Cheese and Bacon Muffins
adapted from Mix&Match Meals, Page 108 (starters)
5 1/2 oz (150g) Canadian bacon, sliced
7oz (200g) Cheddar cheese, cut up into small cubes
1 1/4 cups whole wheat/grain bread crumbs
1/2 bunch of scallions, finely chopped
3 eggs
1/2 cup milk
salt and ground black pepper
Pam for greasing
1. Fry the bacon until cooked but not too crispy, then cut into bite-sized pieces. Mix together the cheese with the bread crumbs, scallions, eggs and milk. Stir in the bacon.
2. Season generously with salt and pepper, then spoon into 4 buttered ramekins (or into your muffin trays). Bake in the oven at 375F (190C) for about 25 minutes until risen and golden. Serve hot or cold.
Stuffed Fillet Steak with Chili and Parsley Butter
adapted from Mix&Match Meals, Page 64 (Main Course)
4 sirloin steaks, about 8oz (225g) each, cut to a minimum 1 inch (2.5cm) thick
4 1/2oz (125g) light cream cheese
1 tbsp olive oil
sea salt and freshly ground black pepper
for Chili and Parsley Butter
5 tbsp salted butter
1 tsp hot red pepper flakes
2 tbsp finely chopped flat-leaf parsley leaves
Spinach to serve
1. To make the chili and parsley butter, mix together all the ingredients in a bowl until well combined. Form into a sausage shape, and place in a piece of parchment paper. Roll up into a tube, twist each end of pepper, and chill for 30 minutes.
2. Heat the barbecue until hot. Take each fillet steak and, using a thin pointed knife pierce the side and move the knife from side to side to create a cavity, trying not to increase the size of the opening too much. Place a portion of cream cheese into each opening. Do not over stuff.
3. Grill the steaks on the barbecue over high heat for 3 minutes on each side, turning once. Set on a plate, and let rest for 5 minutes.
4. Serve on top of fresh spinach with a dollop of Chili and Parsley Butter for garnish.
I can't wait to hear about your travels! I hope all is and will continue to go safely.
Love,
Monday, December 12, 2011
Mediterranean Vegetable Bean Soup with Sweet Potato and Walnut Fritters
To My Beautiful Jessica,
I am very excited about this entry for a couple reasons. The main one being: I didn't expect it to be an amazing meal... but it was!
It was a bit of a crazy weekend. We were at a Christmas party late Friday night. Poor Jason then had to get up and work early on Saturday, only to come home and head to Toronto with me to see some friends who just came back from living in Italy. We did not make it back to Peterborough until 3 in the morning. On Sunday morning we had an amazing Sabbath and truly rested. We slept until we wanted to get up and when we did, we relaxed some more.
Looking in the fridge, I realized how much of a disaster it was and how little food there seemed to be. Following this realization, I flipped through the only cook book I had there which turned out to be the Autumn edition of Food and Drink. I chose these two recipes because they contained many of my favourite things and seemed low maintenance. We bundled up and made a leisurely trip to the grocery store. Upon our return I cleaned out the fridge and slowly began putting dinner together in the same attitude I do with painting pictures. I had no expectation of how it would turn out. I was cooking merely for the pleasure of the process. No rush. No pressure. Just fun.
Mediterranean Vegetable Bean Soup
adapted from this recipe
Serves 8
12 plum tomatoes (3lbs), chopped
2 sweet red peppers, chopped
1 small eggplant, about 1lb, peeled and cut into 1/2 inch cubes
1 large onion, coarsely chopped
Salt and freshly ground pepper
1/4 cup olive oil
6 cloves garlic, peeled
1 tbsp chopped fresh basil
2 tsp chopped fresh thyme
1/2 tsp chopped fresh rosemary
4 cups chicken or veggie broth (or water)
1 can (540mL) white pea (navy) or kidney beans, drained and rinsed
1/2 cup crumbled feta cheese (for garnish)
1. Preheat oven to 425F.
2. Line 2 large baking sheets with parchment paper.
3. Combine tomatoes, red peppers, eggplant and onion. Sprinkle with 1 tsp each salt and pepper and drizzle with oil. Toss and evenly coat. Divide among baking sheets and spread out into a single layer. Toss garlic with oil left in bowl and arrange together on one of the baking sheets. Roast in upper and lower thirds of oven, rotating sheets halfway, for about 45 minutes or until vegetables are soft and browned.
4. Set roasted garlic aside. Transfer remaining roasted vegetables and all juices to a large pot. Stir in oregano, thyme, rosemary and water and bring to a boil over high heat. Reduce heat and simmer, stirring occasionally, for about 10 minutes or until flavours are blended.
5. Using a slotted spoon, transfer about 3 cups of vegetables into a blender or food processor or large bowl. Add reserved garlic and half of the beans to blender, food processor or bowl. Purée or mash, adding a little of the broth from the pot if necessary, until smooth. Stir back into pot along with remaining beans and return to a simmer over medium heat, stirring often. Season to taste with salt and pepper. Garnish each bowl with feta cheese.
Sweet Potato and Walnut Fritters
adapted from this recipe
1 lb sweet potato
2 tbsp melted butter
1 tbsp brown sugar
2 tbsp fresh chopped mint
1/2 tsp salt
1/2 tsp dry mustard powder
1/4 tsp cayenne pepper
1 egg lightly beaten
1/2 cup all-purpose flour
1/2 cup ground toasted walnuts
1 tbsp baking powder
1/2 cup chopped toasted walnuts
Dip
1/2 cup Greek-style plain yogurt
1 tbsp minced onion
2 tbsp fresh chopped mint
1/4 tsp each salt and fresh cracked pepper
1. Prick sweet potato all over with a knife and bake at 475F for 45-60 minutes. Let sit for 10 minutes, or until cool enough to handle. Slice in half and spoon out enough potato to make 1 cup. Put into bowl and mash with butter until smooth. Stir in sugar, mint, salt, mustard and cayenne. Stir in egg.
2. In separate bowl, combine flour, ground walnuts and baking powder. Stir into sweet potato mixture with chopped walnuts until well combined.
3. Preheat oven to 325F. Spray mini muffin trays. Spoon heaping portions into muffin trays. Bake for 12-15 minutes.
4. In a bowl, combine yogurt, onion, mint, salt and pepper. Serve with hot fritters.
A couple main changes I made were: I didn't have a blender, so I mashed some of the soup instead. For the fritters the recipe said to deep fry them with oil in a pan. I didn't want to do this so I just baked them. They worked really well. Try both of these!
Also, I'm sorry about the quality of the images. Jason lent his camera to Jim again, so we had to resort to using my phone.
I hope you are doing well. I miss you of course, but know I will see you shortly for wedding dress shopping!
So much love,
I am very excited about this entry for a couple reasons. The main one being: I didn't expect it to be an amazing meal... but it was!
It was a bit of a crazy weekend. We were at a Christmas party late Friday night. Poor Jason then had to get up and work early on Saturday, only to come home and head to Toronto with me to see some friends who just came back from living in Italy. We did not make it back to Peterborough until 3 in the morning. On Sunday morning we had an amazing Sabbath and truly rested. We slept until we wanted to get up and when we did, we relaxed some more.
Looking in the fridge, I realized how much of a disaster it was and how little food there seemed to be. Following this realization, I flipped through the only cook book I had there which turned out to be the Autumn edition of Food and Drink. I chose these two recipes because they contained many of my favourite things and seemed low maintenance. We bundled up and made a leisurely trip to the grocery store. Upon our return I cleaned out the fridge and slowly began putting dinner together in the same attitude I do with painting pictures. I had no expectation of how it would turn out. I was cooking merely for the pleasure of the process. No rush. No pressure. Just fun.
Mediterranean Vegetable Bean Soup
adapted from this recipe
Serves 8
12 plum tomatoes (3lbs), chopped
2 sweet red peppers, chopped
1 small eggplant, about 1lb, peeled and cut into 1/2 inch cubes
1 large onion, coarsely chopped
Salt and freshly ground pepper
1/4 cup olive oil
6 cloves garlic, peeled
1 tbsp chopped fresh basil
2 tsp chopped fresh thyme
1/2 tsp chopped fresh rosemary
4 cups chicken or veggie broth (or water)
1 can (540mL) white pea (navy) or kidney beans, drained and rinsed
1/2 cup crumbled feta cheese (for garnish)
1. Preheat oven to 425F.
2. Line 2 large baking sheets with parchment paper.
3. Combine tomatoes, red peppers, eggplant and onion. Sprinkle with 1 tsp each salt and pepper and drizzle with oil. Toss and evenly coat. Divide among baking sheets and spread out into a single layer. Toss garlic with oil left in bowl and arrange together on one of the baking sheets. Roast in upper and lower thirds of oven, rotating sheets halfway, for about 45 minutes or until vegetables are soft and browned.
4. Set roasted garlic aside. Transfer remaining roasted vegetables and all juices to a large pot. Stir in oregano, thyme, rosemary and water and bring to a boil over high heat. Reduce heat and simmer, stirring occasionally, for about 10 minutes or until flavours are blended.
5. Using a slotted spoon, transfer about 3 cups of vegetables into a blender or food processor or large bowl. Add reserved garlic and half of the beans to blender, food processor or bowl. Purée or mash, adding a little of the broth from the pot if necessary, until smooth. Stir back into pot along with remaining beans and return to a simmer over medium heat, stirring often. Season to taste with salt and pepper. Garnish each bowl with feta cheese.
Sweet Potato and Walnut Fritters
adapted from this recipe
1 lb sweet potato
2 tbsp melted butter
1 tbsp brown sugar
2 tbsp fresh chopped mint
1/2 tsp salt
1/2 tsp dry mustard powder
1/4 tsp cayenne pepper
1 egg lightly beaten
1/2 cup all-purpose flour
1/2 cup ground toasted walnuts
1 tbsp baking powder
1/2 cup chopped toasted walnuts
Dip
1/2 cup Greek-style plain yogurt
1 tbsp minced onion
2 tbsp fresh chopped mint
1/4 tsp each salt and fresh cracked pepper
1. Prick sweet potato all over with a knife and bake at 475F for 45-60 minutes. Let sit for 10 minutes, or until cool enough to handle. Slice in half and spoon out enough potato to make 1 cup. Put into bowl and mash with butter until smooth. Stir in sugar, mint, salt, mustard and cayenne. Stir in egg.
2. In separate bowl, combine flour, ground walnuts and baking powder. Stir into sweet potato mixture with chopped walnuts until well combined.
3. Preheat oven to 325F. Spray mini muffin trays. Spoon heaping portions into muffin trays. Bake for 12-15 minutes.
4. In a bowl, combine yogurt, onion, mint, salt and pepper. Serve with hot fritters.
A couple main changes I made were: I didn't have a blender, so I mashed some of the soup instead. For the fritters the recipe said to deep fry them with oil in a pan. I didn't want to do this so I just baked them. They worked really well. Try both of these!
Also, I'm sorry about the quality of the images. Jason lent his camera to Jim again, so we had to resort to using my phone.
I hope you are doing well. I miss you of course, but know I will see you shortly for wedding dress shopping!
So much love,
Labels:
appetizers,
beans,
biscuits,
cheese,
hearty,
simple,
soup,
sweet potatoes,
tomatoes,
vegetarian
Saturday, September 10, 2011
Champagne Birthday
Dear Sally,
Thank you so much for your words of encouragement. Junior Kindergarten is so much fun! My students are so little and have the most wonderful ideas about God’s love and power. I am sure I will have many stories to share over the next ten months.
Your last blog about breakfast sounded absolutely delicious! What a perfect way to start a day! As I mentioned earlier in the week I have accepted the
position of EA in the Grade 8 classroom on Tuesdays and Thursdays. They are a wonderful bunch of 33 students and I am blessed to be working with them as well as my own students. Between the two grades I am keeping quite busy so I am very glad to have some time this morning to write about your 25th birthday. It was a pleasure to be able to work with your parents to plan this special evening with you. I have truly enjoyed our friendship and cannot wait for the things that are to come in our lives. Thank you for letting me share your joys, fears, anger and tears. I love you!
For those of you who were not able to join us for S
ally’s party I will try to do my best to explain the extravagant spread that we laid out for all. I wanted to feature as many gluten-free items as possible and if you know food at all you will know that this can sometimes be a challenge! We had cheesy and flaky cheese straws smother
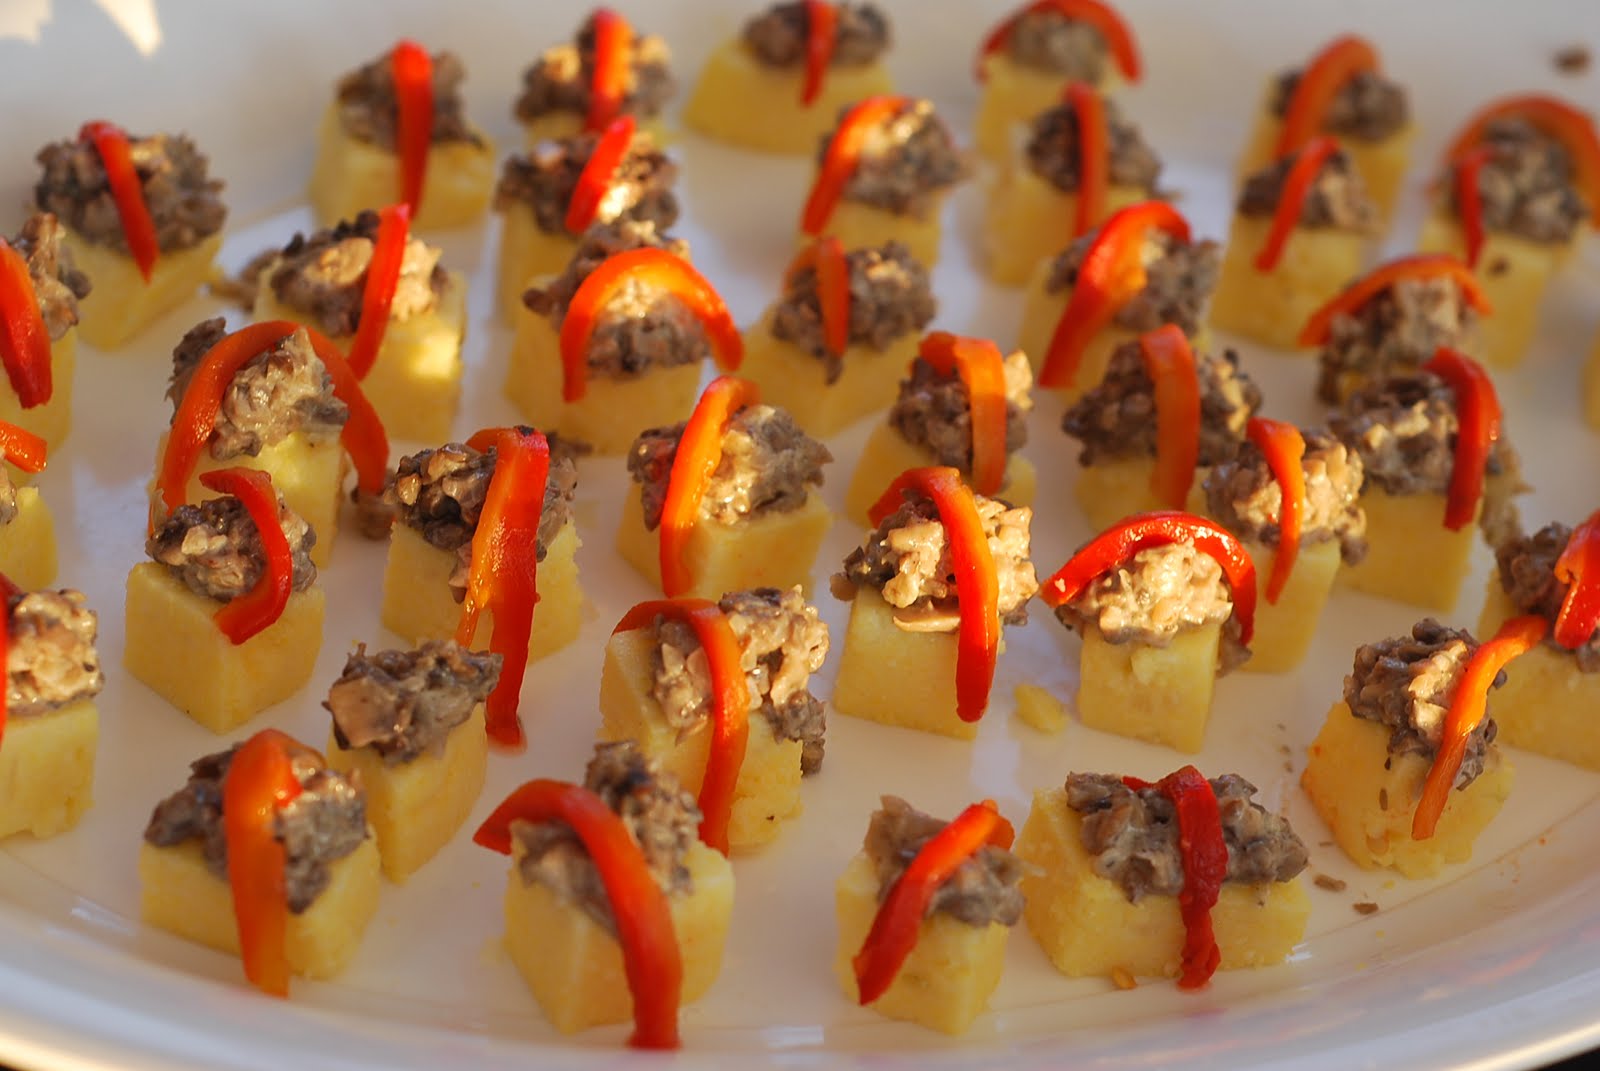
ed in a two-year-old cheddar. For those who enjoy a little dipping action while they eat I sliced two fresh breadsticks in to large chunks and hollowed out the middle. This allowed me to fill the bread with sliced vegetables and dip. Beside these were copious amounts of the mushroom polenta squares. These small delightful treats
– I am told – were a delicious little pop-in-your-mouth treat combining savory mushroom flavours with a hint of sharp cheddar and roasted red pepper topper. Of all the foods featured that night I have to confess that I am most proud of the flourless chocolate cake. A small piece is all you need of these tasty treat but it is well worth the wait.
Easy Flourless Chocolate Cake with Silky Chocolate Glaze
Ingredients:
6 1-ounce squares coarsely chopped semisweet chocolate
1/2 cup (1 stick) unsalted butter
3/4 cup sugar
3 large eggs
1/2 cup cocoa
1/4 teaspoon salt
1 teaspoon vanilla
For Glaze:
2 1-ounce squares coarsely chopped semisweet chocolate squares
1 1/2 tablespoons unsalted butter
1 1/2 teaspoon milk OR light coconut milk
1 1/2 teaspoons Agave syrup OR honey
1/8 teaspoon vanilla
Directions:
1. Preheat oven to 350°F
2. Spray a 7-inch tart pan with removable bottom with cooking spray. If you don't have a tart pan, use a 6 to 7-inch springform pan. Line the bottom of the pan with parchment paper and spray the paper.
3. Melt 6 ounces of chopped chocolate and butter in a heavy saucepan over medium low heat. Stir until chocolate and butter are melted and smooth.
4. Add sugar and salt and reduce heat to low. Cook while stirring for about one minute, until sugar starts to dissolve.
5. Remove pan from heat. Whisk in eggs, one at a time. The mixture will look smooth and glossy.
6. Use a mesh hand sieve to sift cocoa into mixture. This prevents lumps. Whisk until the cake batter is smooth.
7. Pour batter into prepared pan and bake in preheated oven for about 25 minutes. The center of the cake should be just firm to the touch, but be careful to not overbake the cake or it will be dry.
8. Cool in the pan on a wire rack for 15 minutes. Invert the cake on a plate.
9. To prepare the glaze, melt 2 ounces of chopped chocolate and 1 1/2 tablespoons of unsalted butter in the same saucepan you used to make the cake. When melted and smooth, remove the pan from heat. Add milk and Agave syrup OR honey and vanilla and stir until smooth and glossy. Let the glaze cool for about 3 minutes before pouring it on the cake.
9. Pour all of the glaze in the middle of the cake. Use a silicone or rubber spatula to spread the glaze evenly over the cake, allowing the glaze to evenly run down the sides of the cake.
Cheese Straws
1 ¾ cups finely grated sharp cheddar cheese
1 package frozen puff pastry, thawed
2 teaspoons coarse salt
1. Preheat oven to 425 degrees.
2. Sprinkle work surface with ½ cup cheese. Place chilled puff pastry on a work surface and roll out until it is about 1/8 inch thin. Trim to a 14-by-16 inch rectabgle. Sprinkle with 1 teaspoon salt and ¾ cup of the cheese.
3. With the long side facing you. Fold in half by bringing the top edge down toward you. Sprinkle with the remaining teaspoon of salt and ½ cup cheese. Using a pizza wheel or a very sharp knife, cut the dough horizontally into 1/2-inch-wide strips. Divide strips between two baking sheets, placing them evenly apart. Holding each end of a dough strip with your fingers, carefully stretch and twist the strip in opposite directions. Repeat process with remaining strips.
4. Bake until golden brown, 12 to 14 minutes. Let straws cool on baking sheet for 5 minutes before transferring to a wire rack to cool completely.
Loaded Sweet-Potato Skins
4 medium sweet potatoes (about 2 pounds total), scrubbed and patted dry
1 tablespoon olive oil
Coarse salt and ground pepper
1/4 cup low-fat buttermilk
1/4 teaspoon sweet paprika, plus more for garnish
4 slices bacon
1/4 cup reduced-fat sour cream
1 scallion, sliced, for garnish
1. Preheat oven to 450 degrees. On a rimmed baking sheet, rub sweet potatoes with oil; season with salt and pepper. Bake until tender, 40 to 45 minutes. Let cool on sheet (keep oven on).
2. Halve sweet potatoes lengthwise; scoop out 1/3 cup flesh from each half into a medium bowl. Add buttermilk and paprika to bowl. Mash until smooth; season with salt and pepper. Stuff sweet-potato skins with filling. (To store, refrigerate, up to 2 days.)
3. Arrange sweet-potato skins on sheet; bake until lightly browned around edges, about 15 minutes.
4. Meanwhile, in a skillet, cook bacon over medium until crisp, 5 to 8 minutes. Drain on a paper-towel-lined plate; crumble. Stir together sour cream and 2 tablespoons water; drizzle over sweet-potato skins. Garnish with bacon, paprika, and scallion; cut in half to serve.
Mushroom-Polenta Diamonds
6 ounces shiitake mushrooms, stems removed, and caps wiped clean
1 tablespoon unsalted butter, plus more for baking sheet
1 small onion, minced
2 tablespoons port or dry white wine
6 tablespoons heavy cream
1 teaspoon coarse salt, plus more for seasoning
Freshly ground pepper
1 cup instant polenta
1/2 cup freshly grated Parmesan cheese (2 ounces)
2 roasted red bell peppers, cut into thin slivers, for garnish (optional)
Mascarpone cheese, for garnish (optional)
1. In a food processor, pulse mushrooms until finely chopped. Melt butter in a medium skillet over medium heat. Add onion; cook, stirring occasionally, until softened, about 4 minutes. Add mushrooms; cook until softened, about 3 minutes. Add port, and stir until evaporated. Stir in cream; simmer until mixture is thick, about 3 minutes. Season with salt and pepper. Remove from heat; let cool.
2. Butter a 10-by-15-inch rimmed baking sheet; set aside. Boil 1 quart water in a large saucepan; add 1 teaspoon salt. While whisking constantly, gradually add polenta. Reduce heat to a simmer; cook, whisking constantly, until soft and all water is absorbed, about 5 minutes. Stir in Parmesan. Immediately transfer to prepared baking sheet; spread evenly. Let cool completely; cover with plastic wrap, and refrigerate until ready to proceed. Polenta can be made up to 1 day ahead.
3. Halve the polenta crosswise. Carefully transfer one half, smooth side down, to a clean work surface; spread mushroom mixture on top. Place remaining polenta half, smooth side up, on top; trim edges.
4. Cut polenta lengthwise into 3/4-inch-wide rows; cut rows at an angle to form 1-inch-long diamonds. Place on parchment-lined baking sheets. Wrap in plastic wrap; freeze until ready to use, up to 6 weeks.
5. To serve, preheat oven to 425 degrees. Transfer sheets to oven. Bake diamonds, rotating sheets halfway through, 12 to 15 minutes. Garnish each with bell pepper and a dab of mascarpone, if desired. Serve warm.
Subscribe to:
Posts (Atom)