
Dear Sally,
Thank you so much for your words of encouragement. Junior Kindergarten is so much fun! My students are so little and have the most wonderful ideas about God’s love and power. I am sure I will have many stories to share over the next ten months.
Your last blog about breakfast sounded absolutely delicious! What a perfect way to start a day! As I mentioned earlier in the week I have accepted the  position of EA in the Grade 8 classroom on Tuesdays and Thursdays. They are a wonderful bunch of 33 students and I am blessed to be working with them as well as my own students. Between the two grades I am keeping quite busy so I am very glad to have some time this morning to write about your 25th birthday. It was a pleasure to be able to work with your parents to plan this special evening with you. I have truly enjoyed our friendship and cannot wait for the things that are to come in our lives. Thank you for letting me share your joys, fears, anger and tears. I love you!
 position of EA in the Grade 8 classroom on Tuesdays and Thursdays. They are a wonderful bunch of 33 students and I am blessed to be working with them as well as my own students. Between the two grades I am keeping quite busy so I am very glad to have some time this morning to write about your 25th birthday. It was a pleasure to be able to work with your parents to plan this special evening with you. I have truly enjoyed our friendship and cannot wait for the things that are to come in our lives. Thank you for letting me share your joys, fears, anger and tears. I love you!
For those of you who were not able to join us for S ally’s party I will try to do my best to explain the extravagant spread that we laid out for all. I wanted to feature as many gluten-free items as possible and if you know food at all you will know that this can sometimes be a challenge! We had cheesy and flaky cheese straws smother
 ed in a two-year-old cheddar. For those who enjoy a little dipping action while they eat I sliced two fresh breadsticks in to large chunks and hollowed out the middle. This allowed me to fill the bread with sliced vegetables and dip. Beside these were copious amounts of the mushroom polenta squares. These small delightful treats
  – I am told – were a delicious little pop-in-your-mouth treat combining savory mushroom flavours with a hint of sharp cheddar and roasted red pepper topper. Of all the foods featured that night I have to confess that I am most proud of the flourless chocolate cake. A small piece is all you need of these tasty treat but it is well worth the wait.
 ally’s party I will try to do my best to explain the extravagant spread that we laid out for all. I wanted to feature as many gluten-free items as possible and if you know food at all you will know that this can sometimes be a challenge! We had cheesy and flaky cheese straws smother
 ed in a two-year-old cheddar. For those who enjoy a little dipping action while they eat I sliced two fresh breadsticks in to large chunks and hollowed out the middle. This allowed me to fill the bread with sliced vegetables and dip. Beside these were copious amounts of the mushroom polenta squares. These small delightful treats
 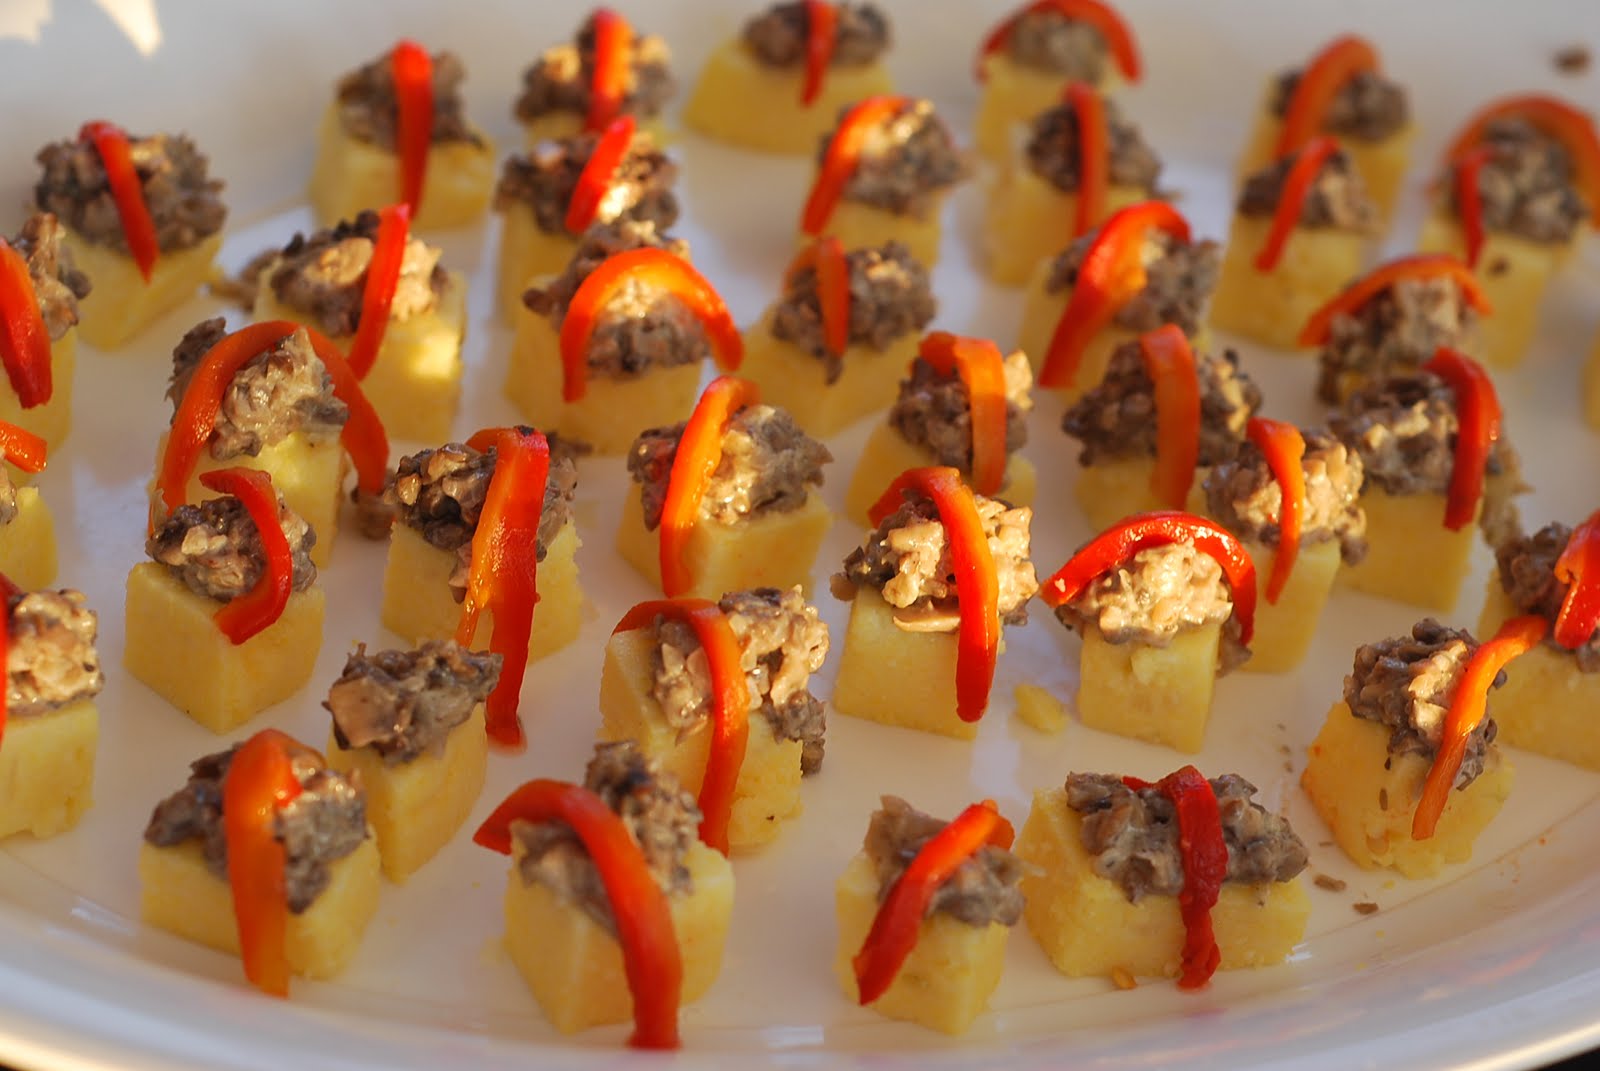 – I am told – were a delicious little pop-in-your-mouth treat combining savory mushroom flavours with a hint of sharp cheddar and roasted red pepper topper. Of all the foods featured that night I have to confess that I am most proud of the flourless chocolate cake. A small piece is all you need of these tasty treat but it is well worth the wait.

Easy Flourless Chocolate Cake with Silky Chocolate Glaze
(all recipes are adapted from mathastewart.com) 

Ingredients:
6 1-ounce squares coarsely chopped semisweet chocolate
1/2 cup (1 stick) unsalted butter
3/4 cup sugar
3 large eggs
1/2 cup cocoa
1/4 teaspoon salt
1 teaspoon vanilla
For Glaze:
2 1-ounce squares coarsely chopped semisweet chocolate squares
1 1/2 tablespoons unsalted butter
1 1/2 teaspoon milk OR light coconut milk
1 1/2 teaspoons Agave syrup OR honey
1/8 teaspoon vanilla
Directions:
1. Preheat oven to 350°F
2. Spray a 7-inch tart pan with removable bottom with cooking spray. If you don't have a tart pan, use a 6 to 7-inch springform pan. Line the bottom of the pan with parchment paper and spray the paper.
3. Melt 6 ounces of chopped chocolate and butter in a heavy saucepan over medium low heat. Stir until chocolate and butter are melted and smooth.
4. Add sugar and salt and reduce heat to low. Cook while stirring for about one minute, until sugar starts to dissolve.
5. Remove pan from heat. Whisk in eggs, one at a time. The mixture will look smooth and glossy.
6. Use a mesh hand sieve to sift cocoa into mixture. This prevents lumps. Whisk until the cake batter is smooth.
7. Pour batter into prepared pan and bake in preheated oven for about 25 minutes. The center of the cake should be just firm to the touch, but be careful to not overbake the cake or it will be dry.
8. Cool in the pan on a wire rack for 15 minutes. Invert the cake on a plate.
9. To prepare the glaze, melt 2 ounces of chopped chocolate and 1 1/2 tablespoons of unsalted butter in the same saucepan you used to make the cake. When melted and smooth, remove the pan from heat. Add milk and Agave syrup OR honey and vanilla and stir until smooth and glossy. Let the glaze cool for about 3 minutes before pouring it on the cake.
9. Pour all of the glaze in the middle of the cake. Use a silicone or rubber spatula to spread the glaze evenly over the cake, allowing the glaze to evenly run down the sides of the cake.
Cheese Straws
1 ¾ cups finely grated sharp cheddar cheese
1 package frozen puff pastry, thawed
2 teaspoons coarse salt
1. Preheat oven to 425 degrees.
2. Sprinkle work surface with ½ cup cheese. Place chilled puff pastry on a work surface and roll out until it is about 1/8 inch thin. Trim to a 14-by-16 inch rectabgle. Sprinkle with 1 teaspoon salt and ¾ cup of the cheese.
3. With the long side facing you. Fold in half by bringing the top edge down toward you. Sprinkle with the remaining teaspoon of salt and ½ cup cheese. Using a pizza wheel or a very sharp knife, cut the dough horizontally into 1/2-inch-wide strips. Divide strips between two baking sheets, placing them evenly apart. Holding each end of a dough strip with your fingers, carefully stretch and twist the strip in opposite directions. Repeat process with remaining strips.
4. Bake until golden brown, 12 to 14 minutes. Let straws cool on baking sheet for 5 minutes before transferring to a wire rack to cool completely.
Loaded Sweet-Potato Skins
4 medium sweet potatoes (about 2 pounds total), scrubbed and patted dry
1 tablespoon olive oil
Coarse salt and ground pepper
1/4 cup low-fat buttermilk
1/4 teaspoon sweet paprika, plus more for garnish
4 slices bacon
1/4 cup reduced-fat sour cream
1 scallion, sliced, for garnish
1. Preheat oven to 450 degrees. On a rimmed baking sheet, rub sweet potatoes with oil; season with salt and pepper. Bake until tender, 40 to 45 minutes. Let cool on sheet (keep oven on).
2. Halve sweet potatoes lengthwise; scoop out 1/3 cup flesh from each half into a medium bowl. Add buttermilk and paprika to bowl. Mash until smooth; season with salt and pepper. Stuff sweet-potato skins with filling. (To store, refrigerate, up to 2 days.)
3. Arrange sweet-potato skins on sheet; bake until lightly browned around edges, about 15 minutes.
4. Meanwhile, in a skillet, cook bacon over medium until crisp, 5 to 8 minutes. Drain on a paper-towel-lined plate; crumble. Stir together sour cream and 2 tablespoons water; drizzle over sweet-potato skins. Garnish with bacon, paprika, and scallion; cut in half to serve.
Mushroom-Polenta Diamonds
6 ounces shiitake mushrooms, stems removed, and caps wiped clean
1 tablespoon unsalted butter, plus more for baking sheet
1 small onion, minced
2 tablespoons port or dry white wine
6 tablespoons heavy cream
1 teaspoon coarse salt, plus more for seasoning
Freshly ground pepper
1 cup instant polenta
1/2 cup freshly grated Parmesan cheese (2 ounces)
2 roasted red bell peppers, cut into thin slivers, for garnish (optional)
Mascarpone cheese, for garnish (optional)
1. In a food processor, pulse mushrooms until finely chopped. Melt butter in a medium skillet over medium heat. Add onion; cook, stirring occasionally, until softened, about 4 minutes. Add mushrooms; cook until softened, about 3 minutes. Add port, and stir until evaporated. Stir in cream; simmer until mixture is thick, about 3 minutes. Season with salt and pepper. Remove from heat; let cool.
2. Butter a 10-by-15-inch rimmed baking sheet; set aside. Boil 1 quart water in a large saucepan; add 1 teaspoon salt. While whisking constantly, gradually add polenta. Reduce heat to a simmer; cook, whisking constantly, until soft and all water is absorbed, about 5 minutes. Stir in Parmesan. Immediately transfer to prepared baking sheet; spread evenly. Let cool completely; cover with plastic wrap, and refrigerate until ready to proceed. Polenta can be made up to 1 day ahead.
3. Halve the polenta crosswise. Carefully transfer one half, smooth side down, to a clean work surface; spread mushroom mixture on top. Place remaining polenta half, smooth side up, on top; trim edges.
4. Cut polenta lengthwise into 3/4-inch-wide rows; cut rows at an angle to form 1-inch-long diamonds. Place on parchment-lined baking sheets. Wrap in plastic wrap; freeze until ready to use, up to 6 weeks.
5. To serve, preheat oven to 425 degrees. Transfer sheets to oven. Bake diamonds, rotating sheets halfway through, 12 to 15 minutes. Garnish each with bell pepper and a dab of mascarpone, if desired. Serve warm.
No comments:
Post a Comment