Showing posts with label hearty. Show all posts

Tuesday, June 23, 2015

Chicken Pot Pie

Dear Sally,

I feel like I have finally found a groove. Carter gave me seven hours of sleep last night and I feel like a new woman. After countless months of avoiding my kitchen I am learning to love cooking again.

Monday's meal this week was chicken pot pie. This recipe is nice and basic and I tend to add a little something here and there as usual. I was thinking of you and your new beautiful Charles as I was working away in the kitchen. It wasn't that long ago that Carter was brand new and I was reminded of the amazing support of friends and family, especially the amazing meals you made us. I plan to return the favour and this will be one of the items in your freezer soon.

Chicken Pot Pie
Recipe adapted from lovelylittlekitchen.com

Serves: 4-6

Ingredients:

4 tablespoons butter
1 cup onion, chopped
1 cup celery, chopped
1 cup carrot, chopped
1 cup potato, chopped
1/4 teaspoon salt
2 tablespoons flour
2 cups milk
1/2 cup heavy cream
1 teaspoon "Better Than Bullion" chicken base
2 cups chicken, cooked and chopped
1 teaspoon fresh thyme, rosemary and chives plus more for garnish if desired
1 recipe pie crust (enough for top and bottom of pie)
1 egg, beaten slightly with a fork

Directions:

Prepare your favourite pastry recipe as directed and set aside for assembly.
In a large pot, melt butter over medium high heat.
Add onion, celery, carrot, potato and salt and sauté until onions are translucent and vegetables start to get tender.
Sprinkle flour over vegetables and cook for 1-2 minutes.
Gradually whisk in milk, heavy cream and and Better Than Bullion, and bring to a slow boil.
Simmer gently over medium heat until sauce begins to thicken (5 minutes).
Turn heat to low, and add chicken, rosemary, chives and sage.
Preheat oven to 400 degrees.
Pour chicken mixture into a 9 in piecrust.
Using a pastry brush, brush egg onto the top of the puff pastry.
Bake for 30-35 minutes. The pastry will be a deep golden brown colour.

Cool for 5 minutes before serving.


Love you, 

Jessica

Tuesday, January 13, 2015

Comforting Chicken Soup

Dear Jess,

Wham. Bam. Thank you Tana Ramsay.

This. Soup.

THIS.

SOUP.

Make this soup! The fragrance, the ease, the yumminess! This is by far, the best chicken soup I have ever tasted, made, laid eyes upon... I was nearing the end of making it, and in walks Jason from running errands. "Ooooooooooooo... Sally!' were his exact words after inhaling the aromas of this soup. It's so good that even though I made it on Saturday, right this minute I have another pot of it in the works.

For a while now, I have wanted to make a chicken soup where you cook the entire chicken in the soup. Two of my friends had mentioned that they had tried it and will never go back. I searched for a recipe on the Internet, and didn't really find anything that peaked my interest, or met my expectations. I had given up all hope, and turned to Tana Ramsay's book Home Made. I knew I would find a delicious soup recipe there, even if it wasn't the one I was looking for. Little did I know that fortune was about to shine it's big, beautiful, bright face upon me. Low and behold, on page 6, there is a delightful recipe called Comforting Chicken Soup. And guess what... you cook the whole chicken in it!

I made a few alterations, though I feel I stayed true to her vision.

Comforting Chicken Soup
adapted from Tana Ramsay's Comforting Chicken Soup, Home Made, Page 6

1 Chicken weighing about 2 3/4 lb
2 sticks of celery
2 carrots
2 leeks, cleaned, trimmed and chopped
2 medium onions, chopped
1 bay leaf
6 peppercorns
1 sprig tarragon
2-3 Tbsp olive oil
1/4-1/2 cup spelt flour
1 Tbsp red wine vinegar
salt

1. In a large stock pot, with lid, Put the chicken into the center of the pot and surround with HALF your celery, HALF your carrots, HALF your leeks, and HALF your onions. Throw in the bay leaf, peppercorns, tarragon and a generous pinch of salt and pour over enough water almost to cover the bird, leaving the top of the breast clear. It will poach in the steam. Bring to a boil, then reduce the heat to a slow simmer. Put on the lid and cook very gently for 1 1/2 hours.


2. When the time is up, remove from the heat and allow to cool for as long as it takes to remove the chicken safely. Put the chicken to one side.


3. Pour the cooking broth through a fine sieve into a clean container (I use a large measuring cup) and discard all the vegetables and seasonings.

4. Meanwhile, in a clean pan, add oil, remaining onion, celery, carrots and leeks. Fry until soft, but not coloured. Add the flour and stir well to make a smooth paste around the vegetables. Fry for a couple of minutes, then gradually stir in the broth. Increase the heat and bring to the boil, stirring all the times. Reduce the heat and simmer for 10 minutes. Remove from the heat and allow to cool slightly, then liquidize in batched with a blender (and return to pot), or take your immersion blender to it.

5. Add red wine vinegar.

6. Using your hands, remove the breast meat from the chicken carcass, discarding the skin. (I put the dark meat away for another soup.)


Shred the meat into very small pieces and add to the soup. Season with salt to taste and serve in warm bowls.


A perfect soup, for a Canadian winter.

Love,

Saturday, November 15, 2014

Spicy Black Bean Soup

Dear Jess,

Poor Jason informed me that he is hungry. Almost always. This is not surprising, as the weather has officially become cold, and he works outside. The amount of calories he burns everyday has jumped substantially!

I was lucky enough to win a door prize at my friend and Naturopath's open house for the new location of her clinic Healthy Foundations. To my delight, it was the door prize I most coveted: The Whole Life Nutrition Cookbook. As it says on the cover, it is "A complete nutritional and cooking guide for every stage of life, including over 200 gluten-free, dairy-free, and egg-free recipes." It is packed full of helpful information for people intolerant of many foods, and also what you should be looking for when buying organic. I have found it extremely helpful.

On page 155, there is a recipe for Spicy Black Bean Soup. This is one of many recipes I hope to make in the upcoming winter months. I served it over brown rice, with a salad topped with boiled egg, and homemade poppyseed dressing. (I will include this recipe too!)

Enjoy!

Spicy Black Bean Soup
from The Whole Life Nutrition Cookbook, Page 155


1 Tbsp extra virgin olive oil
1 medium onion, chopped
1/4 tsp sea salt
1 medium red bell pepper, diced (I subbed celery, because I can't have peppers yet)
1 large carrot, diced
1 small jalapeno chili pepper, seeded and chopped
1 tsp cumin powder
1 1/2 teaspoons oregano
1/2 teaspoon chili powder
1/4 tsp chipotle pepper (I omitted this, as I didn't have any)
1 tsp paprika
pinch cayenne
2-3 cups water (I used chicken broth)
6 cups cooked black beans, or 3 cans
2 cups chopped fresh tomatoes, or one 14 oz can
1 cup fresh or frozen corn kernels (I can't eat corn yet either, so I left it out)
1/2 cup chopped cilantro
2 tsp sea salt or Herbamare, or to taste
1 Tbsp apple cider vinegar

1. Heat olive oil in a large soup pot over medium heat; add chopped onion and sea salt. Saute until slightly golden, then add red pepper, carrot, jalapeno pepper; saute-stir a few minutes more. Add spices and stir to coat.

2. Add water, black beans, tomatoes, and corn, add more water/broth if necessary. Turn heat to medium-low and simmer until vegetables are fork tender, about 20-25 minutes.

3. Remove pot from heat and add cilantro. Add Herbamare or sea salt to taste. Add apple cider vinegar. Taste and adjust salt and seasonings if necessary. (I also too my immersion blender to it a bit, to thicken and smooth it out a bit)

Poppy Seed Dressing
adapted from a recipe from a friend

1/3 cup honey (or maple syrup)
1/2 cup cider vinegar
1 tsp salt
1 tsp dried mustard
1 tsp grated onion
1 cup extra virgin olive oil
1 Tbsp poppy seeds

Blend honey, vinegar, salt, mustard and onion together. With the blender on, slowly add olive oil to ensure it infuses effectively. Stir in poppy seeds, and refrigerate!

Like a said earlier, I served the soup over brown rice with a salad. It was a hit with Jason, and he said it filled him up! Woot woot! Win for the wife!

I love you and miss you dreadfully. I hope we can see each other soon.

Love,


Monday, July 7, 2014

Mung Beans and Rice with Indian Spices and Caramelized Onions (in the Slow Cooker!)

Dear Jess,

It. Has. Been. So. Long.

A few reasons:

1) I have a baby, who as soon as I think I have her figured out... she goes and changes everything! I'm pretty sure this will be my story for the rest of my life! (In a good way!)

2) For reasons I will label  (to avoid grossing out our entire following... and you) as 'digestions issues' I am on a diet that has cut out many foods that are staples in many households. Because of this diet, and the aforementioned child, it has taken me a while to adjust and get creative again in the kitchen.

All that being said... life is oh so sweet!

This recipe is one I made simply because I had all the ingredients. It baffled me when it turned out delicious! I will make this again, and again! I found it on a great blog that I stumbled upon on Pinterest. Let me tell you... the onions make this recipe! Whatever you do, don't leave them out!

Mung Beans and Rice with Indian Spices and Caramelized Onions
Adapted from www.nourishingmeals.com


1 1/2 cups dry short grain brown rice
1 cup dry mung beans
1 tsp ground cumin
1/2 tsp turmeric
2 tsp grated fresh ginger or 1/2 tsp dried
6 cups water (I will do chicken broth next time)
1 can organic coconut milk
1 to 1/2 tsp Herbamare or sea salt

*I added carrots and peas as some 'extras'... see instructions for more details.

Onions:
1 tbsp coconut oil or olive oil
1 medium onion, cut into crescent moons
1/4 tsp Herbamare or sea salt
1 tbsp whole cumin seeds
1 1/2 tsp mustard seeds

Place the brown rice, mung beans, ground cumin, turmeric, ginger, and water into your crockpot. Cover and cook on hight for 3 hours, or on low for 6 1/2 hours. After the beans adn rice are cooked, stir in coconut milk and salt. Be sure to stir in any additional ingredients about 30 minutes before the end of the cooking time. Turn off heat.

Heat a skillet over medium heat. Add the oil, then add onions and salt. Saute for approximately 10 minutes. I like tot gradually turn the head down as they cook so they don't turn. By the end of cooking I am using low heat. After about 10 minutes, add cumin and mustard seeds. Continue to cook for 3-5 more minutes, or until onions are caramelized and spices are fragrant.

I served this with fresh sprouts, and avocado. Actually, I think in the picture above, it is spinach... any greens will be yummy! You can add whatever you like! It's comforting and tasty! Next time I will add more spices... definitely more ginger!

I can't wait to see you on Saturday!

Love,

Monday, March 17, 2014

Honey Balsamic Meatballs

Dear Jess,

I hope you had a chance to make the Quinoa 'Fried Rice' over your March Break! I am so happy you were able to come by for a visit during your travels through Peterborough! I miss our chats and giggles. It was nice to be 're-charged' with them last week.

Today was grocery day. This is a good thing because my fridge was empty. It looked like the Grinch came and didn't leave us a crumb! As sad as my fridge sounds, I was actually happy, because the possibilities for meals this week became endless! I could potentially get ingredients for whatever I wanted! Woot woot!

Jason says he has been feeling 'foggy' lately, and has asked if I wouldn't mind making him lunches with no wheat and very little sugar in support of him trying to do a 'cleanse'. This was exciting for me, because it means I get to do more cooking!

Both of these stories, when combined, are what lead me to make these meatballs. I was trying to think of filling, yet wheat-free recipes that would be appropriate (and easy to eat) for Jason's lunch(es).

This recipe does have a little bit of brown sugar in the sauce, and there is sugar in ketchup. I did less sugar and ketchup than it calls for, and added more honey and some agave nectar. It's fun to play around with these things!


Honey Balsamic Meatballs
from www.iowagirleats.com

For the meatballs:
1/3 cup uncooked quinoa, rinsed well
2/3 cup water
1 lb lean ground beef
1 egg, whisked
1 large shallot OR 1/2 small onion, grated or minced
2 garlic cloves, minced
1 Tbsp Worcestershire sauce
1/4 tsp dried thyme
1/8 tsp dried rosemary
salt and pepper

For the Honey-Balsamic BBQ Sauce:
1 cup balsamic vinegar
3/4 cup ketchup
1/3 cup browns ugar
1/4 cup honey
1 Tbsp Worcestershire sauce
1 Tbsp Dijon mustard
1/4 tsp garlic powder
salt and pepper

Combine ingredients for Honey-Balsamic BBQ Sauce in a saucepan. Stir to combine. Bring to a boil over medium-high heat, stirring every so often, then reduce heat and simmer for 45 minutes or until suace is thick and has lost its vinegary bite, stirring every so often.

Meanwhile, combine quinoa and water in a small saucepan. Bring to a boil (lid on) and turn heat down to medium-low, and then cook for 10 minutes. Fluff with a fork then cool slightly.


Preheat oven to 400F. Line a baking sheet with foil. Place a cooking rack on top and sqray very well with nonstick spray. Set aside. (I didn't have a cooking rack that would fit on my baking sheet, so I just lined a large casserole dish with foil, and sprayed it well with olive oil.)

In a large bowl combine cooled quinoa, egg, shallot, garlic, Worcestershire sauce, dried thyme and rosemary. Stir to combine. Add beef and mix to combine using hands. Separate mixture into eighths, then form three meatballs from each segment. This will give you 24 meatballs. (I got a few extra because I wanted to make them a tad smaller) Place on prepared cooling rack. Bake for 15-17 minutes, or until no longer pink in the center. Add meatballs to the sauce and serve! You could also transfer them into a crock pot set to 'warm' if you are doing a potluck/hockey game/party type of night.


I hope your return to school is seamless and a breeze! I, of course, miss you terribly and can't wait until our next visit!

So much love,


Thursday, February 6, 2014

Split Pea Soup

Dearest of all Jessicas,

I miss you terribly. My heart aches when I think of you and Caitlin, and how none of us have seen each other in so long. I think we should all plan a "girls' weekend" over the March break! And since it's the March break, the "weekend" can be in the week! Thoughts?

Anyways. I am writing today to share a recipe (for the first time in quite a long time!) for Split Pea Soup. The story behind this one is as follows. Pork shoulders were on sale a while back for around ten dollars each (bone-in). I had just stocked my freezer with chickens, a turkey and a ham shoulder. I decided to pass this sale by. The next week however, they were approximately six dollars each! Huge 4lb+ Pork shoulder roasts! So I grabbed two. On Tuesday I roasted one in my oven (recipe to come when I roast the second one, as I forgot to take pictures of the final product...). My parents dropped by to see Alice. My mom reminded me that if/when I make stock out of the pork bone, I can make Split Pea Soup! How I managed to forget that's what you make with pork stock, I have no idea... but my Mom saved the day! Thus, yesterday, I ran to the bulk barn for split peas, and last night for dinner, we had Split Pea Soup. What a lovely soup on a blowing, snowing day! (Our snow banks on either side of our driveway are taller than our vehicles... looking out the window with a bowl of this bad boy is absolute comfort.)

Split Pea Soup
heavily adapted from www.foodnetwork.com

1 small onion, chopped
2 cloves of garlic, minced
1 tsp dried oregano
3 tbsp olive oil
1 1/2 tsp kosher salt
1 tsp freshly ground black pepper
8 cups pork broth (made from your pork bone)
2 cups carrots, diced
1 cup sweet potato, diced
1 cup celery, diced
2 cups dried split peas (yellow and/or green)

1. Add onion, garlic, oregano, salt, pepper, and olive oil to a large pot. Simmer until onions are translucent. Add broth, carrots, potato, celery, and HALF the split peas. Bring to a boil and simmer uncovered, for 40 minutes, stirring occasionally.

2. Add remainder of split peas and simmer for another 40 minutes, or until your peas are at desired tenderness. Stir often, so nothing burns to the bottom of your pot. (The soup thickens quickly)

3. Serve!


I hope your winter is going well, and your students are little angels!

So much love,


Monday, January 27, 2014

Lasagna with Homemade Noodles


My Dearest Sally,

Either my eyes deceive me or it has been months since my last post. Where does the time go? I couldn't believe the last post date when I saw it at the top of the page.

I hope that you are doing well. I image that Alice is growing like a weed. It seems that everywhere I go now people are talking about babies or having babies. The more I am around them the more I desperately want to start a family of my own. But not yet.

I am writing this letter to you from the comfort of my kitchen table at 4:00 on a Monday. When I arrived at school this morning one of the other women I work with told me that they had cancelled the busses last minute and that the school was closed. Imagine my excitement when I realized I could catch up on work and then spend an afternoon at home! I have made three dishes so far today, one which will hopefully be up as a post soon.

The recipe that I will share with you today is one that came almost completely from memory. Jesse sometimes mentions a meal that he loves on the off chance that I will  make it for him. He was lucky when we had a lot of ground beef that we needed to use up and I was out of other ideas. I remembered that my parents had lent us their pasta maker before we were married and it has been sitting in our cupboard ever since. I rolled up my sleeves and set to work making homemade pasta for a meaty lasagna. The process of making the noodles was a little complicated with one person but was still a lot of fun. It can be surprisingly easy with the right tools, enough time, and a good television show to keep you going.

Homemade Pasta Dough
Canadian Living

Ingredients

2 cups four
3 eggs
1/4 tsp. salt

1. Mix the flour and salt together and form into a mound with the flower in the bottom of a wide-bottomed dish. (I used a deep pie pan to keep the flour from going everywhere.)

2. Beat your eggs together and pour into the middle of the flour mound. Use a fork to combine the eggs and the flour until it forms a dough. Knead dough for 2-4 minutes by hand or with a dough hook. (I found that the dough hook was not as effective as I would have liked.)

3. Wrap the dough in plastic wrap and set aside for 20 minutes.

4. When the dough is ready, divide it into small manageable sections and run through the pasta maker. I started on the largest setting and ran my section of dough through. After each time I made the opening smaller until the pasta sheets were the thickness I wanted.

5. Let the dough hang until you are ready to use it.


Meaty Lasagna: A Koning Family Recipe


Ingredients

1 1/2 cans tomato sauce (your choice)
500g lean ground beef
1 onion
1-2 cloves garlic
2 Tbsp. Italian seasoning
1 container cottage cheese
2 eggs
2-3 cups shredded cheese (marble or cheddar)
Homemade lasagna noodles

1. I started by cooking my onions and garlic. I chopped the onion into small pieces and sauteed for about 3 minutes. I added the garlic and cooked for another minute before I added the ground beef.

2. Cook the beef until it is no longer pink. Add the tomato sauce and keep warm on the stove. At this point you could add all sorts of vegetables and spices to the mixture. I used a flavourful tomato sauce and skipped the veggies as I didn't have anything else to add.

3. Mix the container of cottage cheese with Italian seasoning and the 2 eggs. Set aside in a separate bowl.

4. Begin layering the lasagna with the meat mixture. Add some of the cottage cheese mixture on top and then place a layer of noodles over that. Repeat this layering process until you only have a layer of meat sauce left on top. Sprinkle the top layer with cheese and cover with tinfoil.

5. Bake in a 350-375 oven for about 45 minutes. If the noodles are a bit chewy leave it in for longer. Once the lasagna is cooked through broil the top for about 2 minutes or until golden brown.


I realize the lasagne doesn't look epic in the pictures but I can tell you that Jesse was very pleased with it. He even shared some with his father who was also impressed with the flavour. It makes a lot if only one person is eating it so ours has lasted a while but it would also be perfect for company.

If you guys are ever in the area let us know. It would be great to see you again soon.

Lots of Love,


Jessica


Wednesday, September 18, 2013

Slow-Cooker Honey-Dijon Pork Roast

Dear Jess,

It has been too long since my last post! And I must apologize that it is another crock-pot recipe... but I have been loving two things these days: crock-pot meals, and soups. They're cheap, easy, and don't involve a lot of energy.

I am 28 weeks pregnant on Thursday. I am loving this stage, but am finding my energy gets zapped unexpectedly. This recipe I tried so I could save my energy for errands and house work today. I wasn't sure how I would like it, as I thought maybe the flavours would be too strong... but I'm thrilled with the results!


Honey-Dijon Pork Roast
adapted from www.food.com

3 lbs pork loin roast
1/3 cup honey
1/3 cup Dijon mustard
1/4 teaspoon garlic powder
1/2 teaspoon rosemary
1 cup beef or chicken broth
salt and pepper
2 -3 tablespoons marsala or sherry vinegar (highly suggested) (optional)
1 tablespoon cornstarch
3 tablespoons water


Place pork in crock-pot. Mix honey, Dijon mustard, garlic powder and rosemary. Pour over pork. Cook on low for 6 hours. 

Remove Pork from crock-pot and slice as desired. Pour liquid into a small pot. Add broth, salt and pepper, marsala or sherry vinegar (if using). Mix cornstarch and water and add to broth mixture. Simmer and whisk until thickened. 
Dinner is served! 

I served this with rice, and oven roasted carrots! (Toss chopped carrots in olive oil, salt, pepper, garlic powder and any other desired herbs/spices. Place in a baking dish. Cook in oven at 400 for 25-40 minutes, or until tender)

I hope your school year has started strong, and you are enjoying your class! 

As always, I miss you and can't wait to see you! Hopefully we can arrange something before the baby comes!

Love,

Friday, March 22, 2013

Crockpot Sausage and Peppers

Dear Jess,

Happy Friday! I feel like I just got rested from our last weekend just in time for this weekend!

As you may have noticed, many of my recipes are as a result of what meat is on sale. This recipe is no different. I have never done sausage in a slow-cooker before, so I thought I would try it out. I will be making this again! It has a very rich flavour, and it makes your house smell like an Italian restaurant! 

Crockpot Sausage and Peppers
adapted from busycooks.about.com
2 lbs sweet or hot Italian sausages
2 onions, chopped
2-3 red peppers
2 cloves garlic, minced
14 oz. can crushed tomatoes, undrained
6oz tomato paste
1/2 cup dry red wine
1 Tbsp dried Italian Seasoning
1/4 tsp pepper

1. Layer half of the onions and half of the peppers on the bottom of your crockpot. Add all of your sausage, and then the rest of the onions and peppers.

2. Mix the remaining ingredients in a bowl and pour into crockpot. Put the lid on, and cook on low for 6 hours.


I served this with mashed potatoes. It would go well with any steamed veggie, and/or rice.

I love you and miss you!

Love,


Wednesday, March 13, 2013

Pulled Pork on Homemade 30 Minute Rolls

Jess!

Mmmmm that last post made me so hungry! It looks yummy!

This meal came about because Pork was way on sale, my husband loves pulled pork, and I needed a slow-cooker meal to be bubbling all day while I was out and about. I simply Googled 'best slow cooker pulled pork' and found this recipe at allrecipes.com. I made a couple changes to suit our taste, and when I came home... my house smelled like I had been slaving away all day! What a delicious, scent! That being said... I also got home to realize I didn't have any buns. Thanks to Google once more, I found this quick bun recipe at realmomkitchen.com. I got home at 4:45, and I was able to pull the pork, make the buns, grate some carrots and apples (for the sandwiches), set the table and clean up my mess all by 5:30! I will be making this meal again!

30 Minute Rolls
adapted from realmomkitchen.com
1 cup plus 2 tbsp warm water
1/3 cup extra virgin olive oil
2 tbsp traditional yeast
1/4 cup sugar
1/2 tsp salt
1 egg
2 cups whole wheat flour
1 1/5 cups white flour

1. Preheat oven to 400 degrees

2. In a large bowl, combine water, oil, yeast and sugar. Allow mixture to rest for 15 minutes. (The yeast will bubble a lot!)

3. With a dough hook, mix in salt and eggs* and whole wheat flour until combined. Add white flour 1/2 cup at a time.

4. Shape dough into 12 balls. Place them on a parchment paper lined cookie sheet and let rest for 10 minutes

5. Bake at 400F for 10 minutes until tops are golden brown.

*If you want to add any seeds (which I definitely will next time!) add at the same time as your salt and eggs.


Slow Cooker Pulled Pork
adapted from allrecipes.com
1 tsp extra virgin olive oil
1 (2lb) pork roast
1 extra large onion, thinly sliced 
1 cup barbeque sauce
1/2 cup apple cider vinegar
1/2 cup veggie broth
1/2 cup brown sugar
1 tbsp prepared yellow mustard
3-5 tbsp Worcestershire sauce
1 tbsp chili powder
2 large cloves garlic, minced
1 1/2 tsp dried thyme


1. Pour your extra virgin olive oil into the bottom of you slow cooker. Place the pork roast into the slow cooker.

2. Sprinkle sliced onion on top of roast.

3.  Combine remaining ingredients into a bowl and stir well. Pour sauce mixture on top of roast. Cover and cook on High for 5-6 hours, or on low for 7-9 hours.

4. Remove the roast from the slow cooker, and shred the meat using two forks. Return the shredded pork to the slow cooker, and stir the meat into the juices.


As I mentioned before, I grated up some carrots and apple to put on the sandwiches. I added salt, pepper and little cumin to this mixture. So satisfying!

I really hope we can arrange something for Saturday! Let me know your plans when you have them!

Love,


Friday, January 25, 2013

Slow Chicken Curry

Dear Jess,

Brrrrrr. It is so cold.

That being said... I am enjoying it more this year than any year. I think the warm winter last year gave me a break, and this year I realized that I missed it a little bit. Well... mainly I think I miss the effect that good food has on a frigid cold day.

This is one of those meals that sets a cold day right. I have made it twice, and I will be making it again. It's from the Everyday Paleo Family Cookbook. It's easy, basic, makes your house smell like heaven, and it tastes yummy. I have put it in my slow cooker on cleaning days, so as I'm working around the house, the smell wafts through the house and I feel like dinner is making itself!

Slow Chicken Curry
From Everyday Paleo Family Cookbook, page 88

2 tbsp curry powder
1 tsp paprika
2 tsp sea salt
1 tsp black pepper
2 lbs boneless, skinless chicken thighs (or breasts)
4 garlic cloves, minced
1 yellow onion, sliced
3 carrots, diced
4 celery stalks, diced
1 cup full-fat canned coconut milk
1 cup Homemade Chicken Broth (I used my homemade Veggie Broth)

1. In a small bowl, mix all of the dry spices together.

2. Place the chicken thighs in slow cooker and pour the spice mixture over the chicken thighs and toss together until all the thighs are coated with the spices.

3. Sprinkle on the minced garlic and add the onions, carrots, and celery.

4. In a small mixing bowl, whisk together the coconut milk and the chicken broth.

5. Pour the coconut milk and chicken broth mixture over the top of the chicken and vegetables and cook on high in the slow cooker for 4 hours or on low for 6-7 hours.


The first time I did this I did it slowly on low for 6-7 hours. The second time I tried it on high for 4 hours. I didn't find any difference. Delicious either way!

I served it on brown and wild rice rice for Jason. For me I put it over some steamed broccoli with a salad. Mmmmm. Snuggle up with the icy wind howling at your windows, and enjoy the warmth and comfort from this meal. Success!

Love,


Monday, November 12, 2012

Homemade Spicy Sausage Alfredo

Dear Sally,

I can totally relate to the feeling of busy. I too often give in to the thought "I don't have time" and get away from cooking. Today was my report card writing day and after I finished my rough copies at noon I decided to jump into the kitchen. Jesse brought home four . .  FOUR pumpkins from his mother's store. He asked if I could use them. My first reaction was excitement over all of the things I could make with pumpkin. That was before I cut, seeded, peeled and boiled it all. Needless to say I had enough of pumpkin after that. I put the pumpkin aside and decided to work on dinner.

Jesse asked me for a creamy pasta and so I opted for an Alfredo. It smelt amazing when I was making it. This is not a dish that can be modified for someone with my allergies and still taste amazing. The recipe comes from my head so it may not be precise but I am sure that it will still taste delicious.

Ingredients

2 tbsp. butter
2 tbsp. flour
salt and pepper to taste
2 cloves garlic
2 cups 18% cream
1 cup shredded old cheddar cheese
2 spicy Italian sausages1 package pasta

Directions

1. Start boiling your salted water for the pasta. When the water comes to a boil prepare the pasta as directed.

2. Cook the Italian sausages over medium heat. Slice and cook again until browned. Set aside.

3. Heat the butter in a small saucepan. When it is melted add the garlic and stir for about 30 seconds then add the flour and stir constantly. Make sure you have the cream near by. Add the cream to the flour mixture a little at a time until it is all added. Stir continually and bring to a boil over medium heat. When the mixture is boiling and begins to thicken add the shredded cheese and stir. Remove from heat and set aside.


4. Combine all ingredients in a large bowl and toss. Serve while hot.


I hope you and Jason are staying nice and cozy in Peterborough. Can't wait to see you soon.

Love You!


Wednesday, November 7, 2012

Italian Sausage and Beef Lasagna

Dearest Jess,

I am sick of always saying 'What a busy time!' I feel like such a wussy wimp! Oh well. Things have been busy, but my school  pictures job has tapered off and I am able to breathe as I contemplate what is to come next. I am getting caught up with housework and cooking. Laundry is finally manageable, and my kitchen has been thoroughly disinfected and wiped down. Hurrah!

This is the second time I have made this recipe. It's from Eat Shrink and be Merry, makes your house smell amazing, and is delicious! I recommend this to anyone!

Ooh-la-la-sagna!
From Eat Shrink and be Merry, Page 137

8oz (227g) light mild Italian Sausage
8oz (227g) extra-lean ground beef
1 cup chopped onions
2tsp minced garlic
1 tsp dried oregano
1/4 tsp crushed red pepper flakes
1 jar (22oz/700ml) tomatoes with Italian herbs, undrained, cut up
1/3 cup chopped fresh basil leaves (I used Thyme this time)
1 tbsp balsamic vinegar
1/2 tsp freshly ground black pepper

12 uncooked whole wheat lasagna noodles
2 cups light ricotta cheese (16oz/454g)
1 pkg (10oz/280g) frozen spinach, thawed, squeezed dry, and chopped (I used fresh spinach)
1/3 cup grated Parmesan, Romano or Asiago cheese
1 egg
1 1/2 cups packed shredded light mozzarella cheese (6oz/170g)

1. Spray a 9 x 13-inch baking dish with cooking spray and set aside.

2. To make sauce, spray a large, non-stick pot or deep, non-stick skillet with cooking spray. Remove casing from sausage and break into small pieces in skillet. Add ground beef, onions, and garlic. Cook an stir over medium-high heat until meat is no longer pink. Stir in oregano and crushed red pepper flakes. Cook 1 more minutes. Add pasta sauce, tomatoes, basil, vinegar, and pepper. Bring mixture to a boil. Reduce heat to low. Cover and simmer for 20 minutes.

3. While sauce is simmering, cook lasagna noodles according to package directions. Drain. Rinse with cold water and drain again.

4. In a medium bowl, mix together ricotta, spinach, Parmesan cheese, and egg. Refrigerate until ready to use.

5. To assemble lasagna, spread 1 cup meat sauce over bottom of baking dish. Top with 4 lasagna noodles, cutting pieces to fit if necessary. Spread 1/3 remaining sauce over noodles, followed by 1/3 mozzarella. Top with 4 more noodles, 1/3 sauce, all of the ricotta mixture, and 1/3 mozzarella. For top layer: 4 noodles, 1/3 sauce, 1/3 mozzarella.

6. Cover lasagna with foil and bake at 375F for 35 minutes. Uncover and bake for an additional 15 minutes. Uncover and bake for an additional 15 minutes. Let lasagna stand, uncovered, for 15 minutes before serving.


I love you and miss you, as always. I am thrilled to hear that you two are able to settle down a little bit. I can't wait to come and see what you've done to your house and have nice long visit!

Love,


Wednesday, October 3, 2012

Curried Squash Soup


Dear Sally,

The dust is starting to settle. My parents how now successfully married off both of their children. It was a beautiful weekend in Ottawa and David and Steph looked very happy.

I hadn't planned ahead for meals this week so this soup was actually just a random act of cooking. Jesse brings home random vegetables for me from his parent's garden . . . hence this soup.

Ingredients
(adapted from The New Moosewood Cookbook) 
3 cups butternut squash
2 1/2 cups chicken stock
1 cup orange juice
1 tbsp. butter
1 cup chopped onion
2 medium cloves garlic, minced
1 1/4 tsp. salt
1/2 tsp. ground cumin
1/2 tsp. cinnamon
1 tsp. fresh ginger
1/4 tsp. dijon mustard
1/2 cup lactose free yogurt
dash cayenne pepper
fresh lemon juice

1) Preheat oven to 375 F. Split the squash lengthwise, remove seeds, and place face-down on a lightly oiled tray. Bake until soft (about 40-50 minutes). Cool, then scoop out the insides. Measure out 3 cups worth and place in a large saucepan. Add the chicken stock and orange juice and bring to a boil.

2) In a frying pan cook onion and garlic over medium heat until clear (about 5-8 minutes). Remove from heat and add to squash mixture. Add the rest of the ingredients to the pot. Using a hand blender, puree soup until it is a nice smooth texture. Serve and enjoy!


I am sure that you will be busy with family this Thanksgiving weekend. Say hi to everyone for me!

Miss you lots,

Jessica

Tuesday, August 21, 2012

Jamie Oliver's Sher Ping Pancakes

Dear Jess,

On Mondays I do the grocery shopping. So on Sundays I always ask Jason, 'What would you like to eat this week?' He then goes through some cookbooks and picks one or two things he would like to have. I then add a third 'new' thing that I would like to try to make.

This week I was craving Sher Ping Pancakes from Jamie's America. That's right. I'm back to Jamie. I missed him and his creative food genius. I have, in fact, made this once before when I first got this cookbook. Probably just over 2 years ago. I made them the day Jason asked me on our first 'official' date. I remember I had trouble with the dough and was interested to see if I could do better. Also: they are delicious. Jamie says:

'Sher ping translates as "pan-cooked filled pancake," and they are one of the best things I've eaten in ages. A lovely lady from the north of China taught me how to make them at her food counter in the Roosevelt Food Court. It sounds like a cheat to explain how to make these pancakes, but it's well worth mastering, because you can swap the pork for other delicious fillings like chicken or seafood.' - Jamie's America, page 49

If you make these (which I definitely think you should) keep in mind that you will need the whole afternoon. The dough has to sit for a couple hours, and then after stuffing them they need to chill in the fridge for 20 minutes before you cook them.

I doubled this recipe and used whole wheat bread flour instead of white. (I know... risky... but it turned out so good!) I am going to try to freeze half of them and see how they turn out. (One single batch will make 8. A double makes 16.)

On last thing that is very important... I find you need way more water or less flour. You want your dough to be really stretchy. Whenever I do it exactly like the recipe it's always too dry.

Sher Ping Pancakes
from Jamie's America, Page 49

For the dough
3 1/4 cups white bread flour, plus extra for dusting (I used whole wheat bread flour)
scant 1 cup water
1/4 cup vegetable oil (I used Extra Virgin Olive Oil)
sea salt and freshly ground black pepper

For the filling
14oz ground pork, the best quality you can afford
a handful of finely grated white cabbage (No Frills didn't have any... so I used Savoy cabbage)
a small bunch of fresh cilantro, leaves and stalks finely chopped
a thumb-sized pieces of root ginger peeled and finely grated
4 scallions, trimmed and finely grated
sea salt
freshly ground Szechuan pepper (I used Cayenne pepper)

To serve
sweet chile or hot chile sauce
soy sauce
2 limes, cut into wedges

Make the dough by mixing the flour, water, vegetable oil, a bit of pepper, and a pinch of salt with a fork. Then use your hands to knead it until smooth and elastic. Cover it with plastic wrap and let it rest for a couple of hours.

When you're ready to make your pancakes, mix all your filling ingredients together in a large bowl. Use your hands to really scrunch everything together, and season well with a good pinch of salt and Szechuan pepper.

Dust a clean surface with flour and cut the dough into 8. Divide your filling into 8 even piles. Oil a sheet pan and your hands. Pick up a piece of dough and create a patty like a mini pizza about 4 3/4 inches across and 1/2 inch thick. (I just do it as thin as I can while pretending I'm making a pizza with Dad's secret recipe dough.)

Take one of your piles of filling and pop it into the middle of the dough. Pat it flat with your fingers, then slowly stretch the edges of the dough out, folding them back in over the pork mixture. Do this all the way around and, once closed, press down on the stuffed pancake with your hand. It should be about 1 inch thick and 3 1/4 inches across. (mine were wider because I find it easier than doing it on the frying pan...)


Do the same with the other 7 pancakes, then lay them on your oiled sheet pan and put them into the refrigerator for about 20 minutes or so. After that, get a large dry frying pan on a medium heat. Add a tiny drizzle of oil and lay each pancake, folded side down, in the pan. Gently push down on them with a spatula to flatten them slightly. Keep doing this until they're about 1/2 inch thick and about 4 inches wide. Be careful that the pan's not too hot, though, otherwise your pancakes will brown before they're properly cooked through.

After about 4 minutes you'll have a nice golden color happening, so turn the pancakes over, push them down lightly, and cook them for 4 minutes on the other side. Only push down once on this side. When they're golden and crisp, the meat will be perfectly cooked, but you can always break one open to check.


To serve, pour some chile sauce into one bowl and some soy sauce into another. Pop a few wedges of lime on the side for squeezing over, and dunk away in your sauces. These pancakes hit all the right spots!


So yummy!

I have so much to tell you about Spain! The trip was incredible (duh!) and I will post an entry all about the food we tried once I get all the pictures together! I have already tried to make a couple of them at home!

I love you and miss you. I hope we can get together soon.

Love,


Wednesday, August 15, 2012

Onion Soup and Homemade Croutons


Dear Sally,

I feel like I haven’t been in my own kitchen in ages and that is probably because I haven’t. As you know Jesse and I decided to refinish our hardwood floors and it is quite an undertaking. After spending more than a week at other people’s houses I have been dying to get back into my own kitchen. My happy place.
           
While is displacement Jesse and I took a stroll through an onion field on his street that had just been harvested. We could still smell the scent of fresh onion in the air. Walking through the field we picked up a few of the onions that the machines had left behind and would soon become fertilizer. I knew immediately what I wanted to make with them. Fresh French Onion Soup!

Today while working on my plans for the 2012-2013 school year I took a break to make this delicious soup. It is the simplest thing and yet so delicious and meaty without  the need for beef or chicken

I know you are having an amazing time in Spain. I can’t wait to hear all about the sights, the laughs and of course the food.

Love


Onion Soup
Adapted from The New Moosewood Cookbook

Ingredients

2 tbsp. Earth Balance (this is a vegan product I use instead of butter)
4 large yellow onions sliced thinly
1 tsp. salt
1 tsp Dijon Mustard
a dash or two of thyme
4 cups water (or more if needed)

Directions

1.     Melt the butter in a large saucepan or dutch oven. Add onions and salt, and cook over medium heat about 10 minutes, stirring occasionally.
2.     Add mustard and thyme: stir and cover. Continue to cook very slowly about 35 more minutes. The onions will be exquisitely soft and simmering in their own liquid.
3.     Add water and more salt and pepper if needed. Simmer at least 10 minutes more. Serve topped with croutons and cheese.

Homemade Croutons

Ingredients

2-4 slices of bread or bun cut into cubes
1-2 tbsp melted butter
2-3 cloves garlic
salt and pepper to taste

Directions

1.     Melt the butter in a saucepan and add the garlic. Cook for about 1 minute.
2.     Add the bread cubes and salt and pepper. Stir to coat and toast.
3.     If needed you can toast the crutons further in the oven at 300 for about 10 minutes depending on the level of crunch you are looking for.

Monday, July 30, 2012

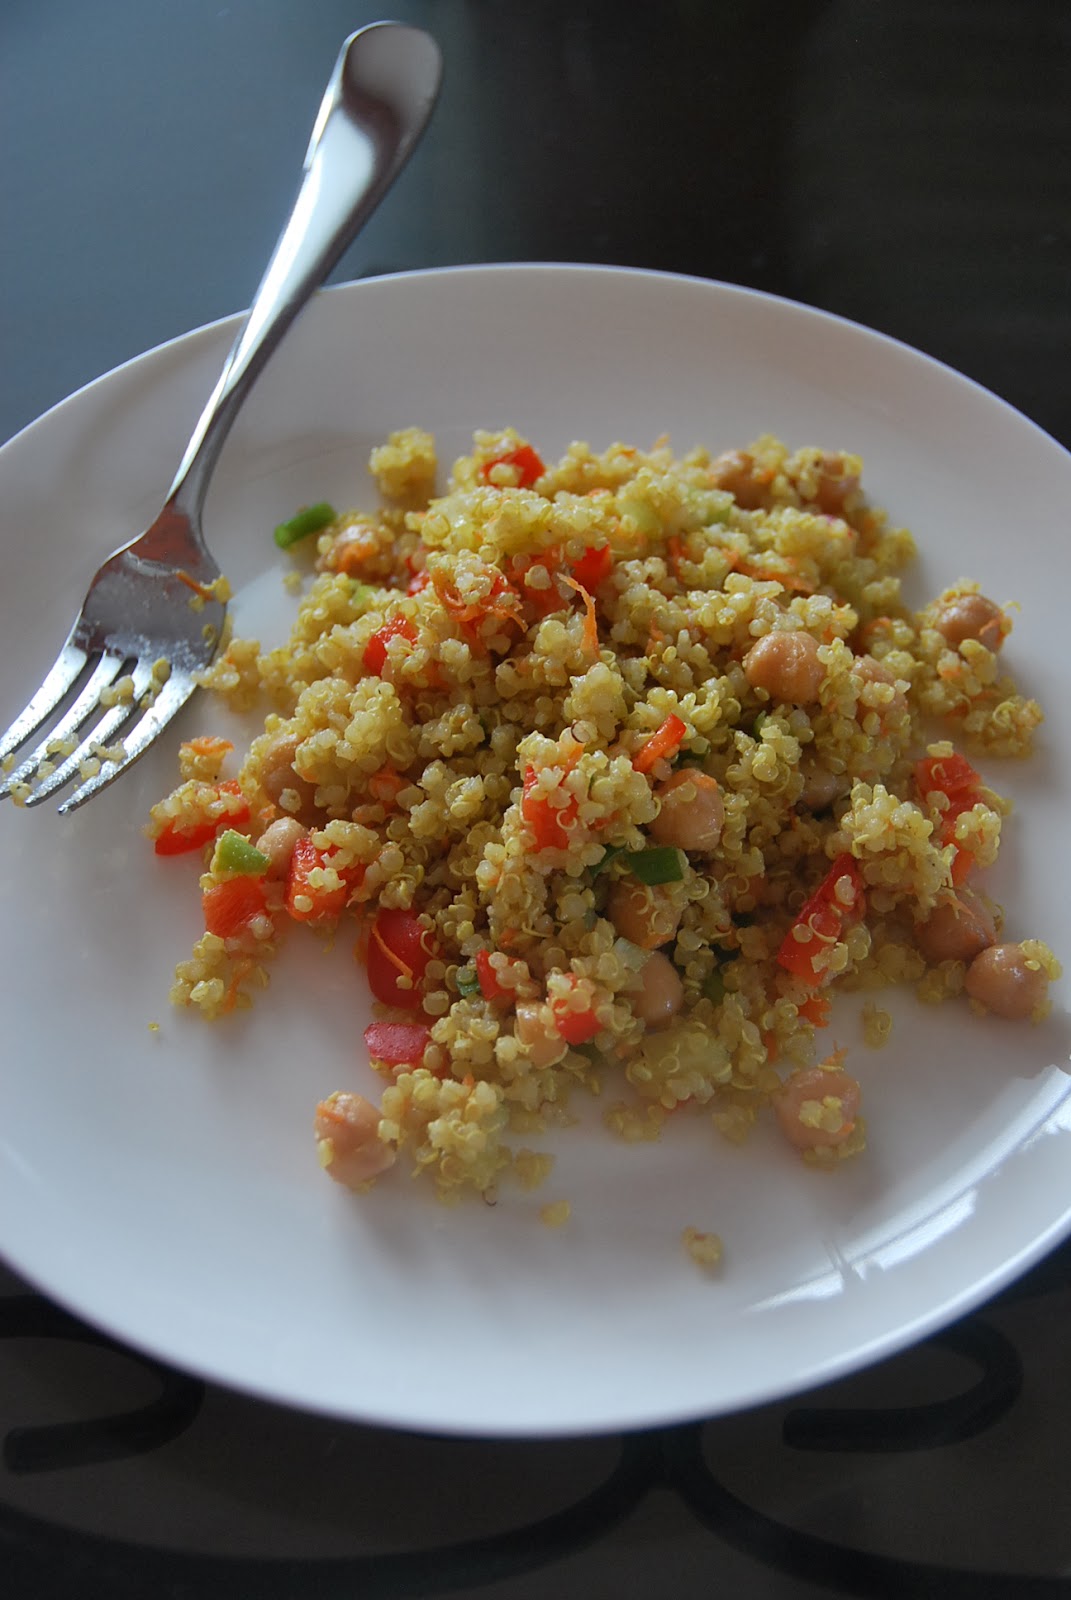
Moroccan and Rollin' Quinoa Salad

Dear Jess,

This Quinoa (pronounced keen-wah) Salad is so good that I made it last week and I am right at this minute making it again. As I sit here writing this entry (in our newly painted 'study/office/drawing room',) the Quinoa is in the pot boiling, and the aroma is floating through the house. (I also have bread baking in the bread-maker, so my house basically smells like heaven.) This is another gem from the Podleski sisters (The Looneyspoons Collection.) On page 38 you will find Moroccan and Rollin' Quinoa Salad.

I have fallen in love with this particular seed for many reasons. One being you can do so much with it, another being it's delicious, and most importantly: it is a full protein! Janet and Greta have a nice little description of it that I will share here with you:

"Though commonly referred to as a grain, quinoa is actually a seed of the goosefoot plant, a relative of leafy green vegetables like spinach and Swiss chard. Once considered 'the gold of the Incas,' Aztec warriors used quinoa to increase their stamina. It's not wonder: quinoa is a nutritional powerhouse! It has twice the protein of brown rice and contains all nine essential amino acids (nutritional building blocks that help form proteins and muscle and other tissue) - rare in the plant kingdom. That's why quinoa is winning the popularity contest among vegetarians and others who don't want to eat meal 'til the cows come home. All that protein plus tons of fiber make it a waist-watcher's dream, a diabetic's dream, a cholesterol-lowering dream and... well... a dream come true for anone who wants to put the best possible fuel in their body. The tiny seeds can boost energy and also contain lots of magnesium that can help prevent high blood pressure and osteoporosis. As an added bonus, quinoa is gluten-free, ideal for those with Celiac disease or other grain sensitivities." (page 38 of The Looneyspoons Collection)

So there you go! One major tip when buying quinoa: make sure you get 'prewashed' or 'prerinsed' quinoa. It will say this on the package. If you don't you have to thoroughly strain it.


Moroccan and Rollin' Quinoa Salad
From Janet and Greta Podleski's The Looneyspoons Collection

1 cup uncooked quinoa
2 cups reduced-sodium vegetable broth
1/4 cup dried currants (I didn't do this)
1 tsp curry powder
1 tsp ground cumin
1/2 tsp ground coriander
1 tsp liquid honey
1/2 tsp salt
1 cup canned no-salt-added chickpeas, drained and rinsed
1/2 cup each finely chopped red bell pepper, grated corrotts and peeled, diced English cucumber
1/3 cup chopped green onions
2 tbsp olive oil
2 tbsp freshly squeezed lemon juice
2 tbsp minced fresh mint leaves
1/4/ tsp freshly ground black pepper

1. Combine quinoa, broth, currants, curry, cumin, coriander, honey and salt in a medium pot. Bring to a boil. Reduce heat to low, cover and simmer for about 20 minutes or until quinoa has absorbed all liquid. Remove from heat. Let stand covered for 10 minutes. Fluff with a fork and leave uncovered to cool completely.

2. When quinoa is cool, transfer to large mixing bowl. Stir in all remaining ingredients. Mix will and refrigerate for at least an hour or two before serving. Tastes even better the next day!

This salad I eat most days for lunch and also include some in Jason's lunch. (He loves it!) It will last me about a week. I will likely make a big batch of this before I go to Spain as part of Jason's 'meal plan' that I will be leaving him.

I can't wait to see/talk to you soon. Hopefully before I leave, but if not sometime shortly after I get back.

Love,

Sally*

*(my signature is on my other computer which is giving me some problems lately...)